Thursday, November 22, 2012

Healthy Alphabet Pasta with Steamed Cod Fish 健康字母意粉


Tired of feeding your little ones with porridge, porridge and porridge all the time? Why not give it a change this time by introducing tiny alphabet organic pasta. It's yummy and give a different variety to little one's diet.

I cooked this for my 3.5 yo and 11.5mo today, both of them loved it and finished the entire bowl each. My elder boy had a bigger bowl of course. :)
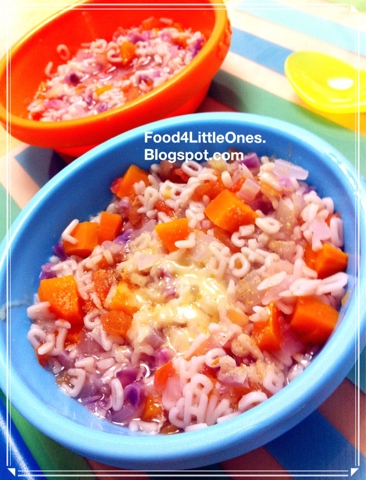

A healthy meal for my precious duo - Organic Alphabet Pasta in vegetable soup.

My Little boy's portion, served with grated cheese and lightly flavored steamed cod fish fillet.


My baby girl's portion, without the grated cheese.


Only fresh ingredients are used in this recipe, no canned puree, no packaged stocks, only the good and natural stuff. Where possible, I try to avoid feeding canned / processed food to my baby especially when under 1 yo.

If you prefer tomato puree version, refer to my earlier post here.


Preparation Time: 10 min
Cooking Time: 15 min
Serving for: 2 little ones

Ingredients:
3 palmfull of alphabet pasta

For vegetable soup base:
- 1 palmful of purple cabbage, finely chopped
- 1 medium carrot, diced
- 1 palmful of pumpkin, diced (I skipped this as I ran out of pumpkin)
- 1/2 medium onion, finely chopped
- 1/2 medium tomatoes, diced
- 1 teaspoon of anchovy powder (refer here for recipe)
- 1 big table spoon of grated cheddar cheese

For Vegetarian version, skip the following ingredients.

For Steamed Cod Fish
- 1 block of cold fish fillet, about 200gm, completely defrost
- A few slices of ginger


Note: you may change the choice of vegetable but tomatoes and carrots shall remain.

The Making:
1. Boil a pot of water (about 4 small rice bowls), once boiled, add all the vegetables. Close the lid and let it shimmer for about 5 minutes. You can add some salt into the soup, but I skipped that as I'm using anchovy powder.

2. In the meanwhile, clean the cod fish,lightly coat with salt and sprinkle with the slice ginger. This is to avoid the fishy smell.

3. Add the alphabet pasta into the soup. Let it boils for 10 minute (or as per the cooking time indicated on the packaging)

4. While the pasta is boiling in the pot, steam the cod fish in a steamer on top of the pot of soup for 5 minutes (if the fillet is thicker than 1", steam slightly longer). You can also stem the fish on a separate pot but this is most time and energy efficient way :)

Note: Use a chopstick or fork to test that the fish is cooked - once it can be easily separated when poked, the fish is ready.

5. Turn off the stove. Sprinkle with some anchovy powder.

6. Serve pasta in a shallow dish, add a big spoonful of grated cheddar cheese on top for added taste and nutrition.

7. Lay the steamed cod fish on top. For elder toddler (above 2 yo), add a few drops of light soya sauce and sesame oil to add flavor for the fish.


The pasta taste best when serve hot, as the cheese will melt in the pasta and give it a nice natural aroma.


This is the organic pasta I used for this post.

Useful tips!
1. Some infants may be allergic to cheese, so for first time feeding, give a small amount and observe for possible allergy sign such as rashes, itchiness etc.

2. For baby between 8mo-12mo, you can boil the soup base for slightly longer so the carrots are thoroughly soften.


A Note about Salt in Baby's Food
Most if not all books and sites I read advised against adding salt, sugar or any artificial flavoring into baby's food, this is to avoid them from becoming a picky eater at young age and most importantly, for health reason. Excess salt may be harmful to baby's kidney at such young age and some processed food already contain certain amount of salt in them.

I have did some reading about salt & sodium for little ones, do read on more here if you are interested..


C'ya!

Saturday, November 17, 2012

Crunchy Cheese Crackers 香脆乳酪饼干


My little boy loves the cheesy goldfish crackers, I usually serve them as snack or part of his breakfast and he will happily eat them all.

So when the little sister's birthday is coming soon, I thought of making some cute shapes cheese crackers that are crunchy and healthy.

I gave a piece of the cheese cracker to my boy the next morning, he loved it instantly and rushed downstairs to get more from the cookie jar. Hehe, success!

The crunchy cheese crackers

For the party, I packed all different shapes into small plastic packages so its easy for little fingers to handle. Let's hope all the kids will like them.

Not a cheese lover? Why not try out this easy butter cookie recipe instead!


Preparation Time: 30 minutes (including cutting the cookie dough)
Cooking Time: 10-15 min
Serving for: 50-60 small cookies

Adopted and modified from original recipe posted on www.homecookinginmontana.com.

INGREDIENTS:
1 cup (100gm) grated Cheddar cheese (or other cheese of your choice for a different flavor. Add more cheese if you like it really cheesy ;)
3 tablespoons unsalted butter, softened and cut into cubes
¾ cup all purpose flour, plus more for dusting
½ teaspoon salt
½ teaspoon ground pepper (optional)
2 tablespoon milk or water


All the ingredients I used

The grated cheese, soft and aromatic


Step-by-Step Guide:
1. Mix butter, salt, sifted flour and ground pepper in a big bowl using a spatula, gradually add the grated cheese, little by little until it's all well mixed and you get a crumb like texture.


2. Add the milk and mix again, until the dough gathers together in a ball.

3. Wrap the dough ball in cling foam and store in freezer for 30 minutes or fridge overnight. This will make the dough less sticky hence easier to work on later.


4. Preheat oven to 175C.

5. Roll the dough out on a floured surface with a rolling pin that has been floured until it is about 1/8 inch thick.

6. Cut the dough into 1-inch squares with a sharp knife / pizza cutter or any cookie cutters you have. Dust the knife or cookie cutter and your hands with some flour to reduce stickiness.


7. Place the crackers flat on a parchment paper on a baking tray, leave at least ¼ inch apart.

8. Bake in middle tray for 12 – 15 minutes until the edges are just starting to brown.

9. Put the baking tray on a rack and let the crackers cool completely.

Fresh from oven, smelling good..


Ready to serve once cool. If you can resist the temptation to eat this crunchy cheese cookies right away (my big guy and I ate a few pieces right away :P), you may store the crackers in an air tight container, good to keep up to a week.


The natural cheddar cheese block I used. Love it's natural taste.

Wednesday, November 14, 2012

Real Happy Meals 2: See The World 开心营养餐-小动物游世界


The Happy Meals post had reached 12 collections, so I thought it's about time to create a new post on the next collection of homemade happy meals. This time, I'm giving it a theme - Little Animals See The World. I have no concrete plan in mind so let's see if I can really create up to 10 sets of happy meals with this theme :)

Little Animals See the World

8th Stop, Sailed the Sea!
Little Animal friends sailed the sea in their strawberries boats, conquering theountains of wholemeal and raisin toasts!


7th Stop, The Magical Forest 
Little animals played hide and seek in the forest, can you see where they are hiding? 

It's really just a simple sandwiched bread with homemade jam (for the tree trunk) and slices of apples & pears for the leaves. Little wholemeal Cherios to resemble the fruits. :)


6th journey, Board the Train 
Little animals are on the journey again, this time they go by the train. Choo Choo!!


Note: the train is made of 1 piece sandwich bread cut into 6 rectangles with some sunflower seeds on top. The wheels are made of dried blueberries and I used almonds and macadamia nuts as the goods. My little boy really enjoyed his breakfast.. :)


5th stop, In the Aquaria
In the aquaria, seeing beautiful jelly fishes (cherries**) and little fish playing around the corals (cheese crackers)..

** If serving for kids under 4, you must cut the cherries into halves or smaller size and remove the core to avoid chocking.


4th stop, go kiting! 
It's a beautiful windy day do the little animals decided to play kites :)


3rd stop, the Golden Gate Bridge
Little animals sailed the sea again to San Francisco! Ethan knew this famous structure through Little Einstein series so he recognized it right away... Half way eating he started singing "London Bridge is falling down" and built this one-like bridge instead (as he called it)... :)

Before


After


2nd stop, The Golden Pyramid at Egypt
Little animals ventured to Egypt where they sailed the Nile river and climbed up the Golden Pyramid.. Ethan helped to build the mini pyramid too :)


1st Stop, Petronas Twin Tower
All journey begins from homeland, isn't it? The Twin Towers, surrounded by KL convention center, a mosque (those are mini red bean paste buns) and a fountain in the central park. Little fish were added on Ethan's request. :)

Monday, November 12, 2012

Pan Fried Teriyaki Salmon with Noodle in Dark Sauce 日酱三文鱼拌干捞面


Are you a noodle lover? I am, so is my little boy and my big guy. I stock up a few types of noodles for days when I crave for simple noodle meal at home. From All-Eggs noodle (全蛋面), Yang Chun noodle (阳春面) and dried scallop noodle (干瑶柱面), I seek for noodles that are non deep fried and if possible, are organic. In KL, stores like The Organic Farm, Village Grocers provides pretty good selection of organic noodles.

This is my version of dried noodle in dark sauce, or you can call this Gan-Lao Mian like how the locals call it. :)


Little one's portion, arranged to resemble Earth with all salmon flakes arranged in the middle.


Ethan loved his noodle. He gave me a thumb up upon first spoonful and happily ate up his portion.

On any other day. I would have served this noodle with barbecue pork loin, char siew, however since I was out of pork loin so salmon seem like a good nutritious substitute. I was also out of bak Choy (小白菜) so used broccoli and carrots instead. You may refer to the sautéed vegetables recipe here.


Preparation Time: 5 min
Cooking Time: 15 min
Serving for: 2 adult + 1 LO (little one)

Ingredients:
For the Noodle:
3 balls of noodles of your choice

Ingredient A (noodle's sauce):
1 table spoon of dark soya sauce 黑酱油
2 table spoon of light soya sauce 酱油
1 table spoon of sesame oil 芝麻油
1 tea spoon of white pepper 胡椒粉

For the Salmon:
200gm fresh salmon block, fully defrost, clean and rub with salt.

Ingredient B (salmon's marinate):
4 table spoon of Teriyaki sauce
1 garlic, finely chopped


Step-by-Step Guides:
1. Marinate the salmon with ingredient B in a deep bowl or a zip lock bag. Cover well and keep refrigerated for about 30 minutes.


2. In a non stick pan, heat up a small tea spoon of olive oil and spread it around the pan. Salmon produces a lot of oil during cooking so it's not necessary to use much oil. This is just to create a coating to ensure the fish will not stick to the pan.

3. Fry the salmon on medium heat fot about 3-5 minutes on each side, depending on thickness. Do not over cook or it may have a bitter after taste. Refrain yourself from flipping the salmon too early if you want it retain in one nice piece after cook.


4. Remove salmon from pan, keep warm.

4. Cook a pot of boiling water (just enough to cover the noodles). Add a dash of salt. Once water is boiled, toss in the noodles and cook for 2-3 minutes, based on the time indicated on the packaging. Spread out the noodle using a pair of chopsticks.

5. While the noodle is cooking, mix all ingredient A in a large bowl.


6. Once noodle is cooked, drain all excess water and add it into the sauce. Mix well.


7. Your food is ready, serve immediately.

Bon appetite! :)


This was the noodle I used for making today's dish...


Useful Tips!
For little ones, press the salmon into flakes using a fork and top onto the noodle. Besides, you may want to cut the noodles shorter so it is easier for little hands to handle.

Saturday, November 10, 2012

Real Happy Meals 开心营养餐

Every weekend, I try to prepare fun happy meal for my little boy for breakfast, this is to make up for all the rush breakfast on weekday mornings. Instead of taking him to McDonald's for the over commercialized Happy Meal, I thought it would be healthier and more fun to make the real happy meal at home. Using simple, fresh ingredients, each happy meal below can be prepared between 5 to 30 minutes depends on the level of complexity and my mood on that day.


Some suggestive tools for food decoration:
  • Essentially, what you really need is just a pair of knife, a spoon and your hands for the food arrangement

  • Cookie cutters of various shapes to cut the sandwich breads (available in most bakery supplies shops, home furnishing stores like IKEA, Aino kitchen has variety of choices too)

  • Cute animal food picks for decoration (really optional but good visual effect and highly reusable)

  • No need for fancy bowls and cutlery, just a plain BPA grade plastic plate for serving. Remember the attention should be the food, not the fancy colorful plate. ;)


  • I'm not into Japanese bento meal, so what I had here are really nothing fancy compared to those super kawaii bento, but just down to earth food to spice up our weekends :)


    Happy Meal #1 - Strawberry Flowers
    Strawberries, kiwi, yogurt and organic alphabet cereals

    Happy Meal #2 - Happy Morning!
    It's a beautiful sunny Saturday, we started the day with cheesy sunflower and raisin butterflies..


    Happy Meal #3 - The Happy Cereal Boy
    Apple dipped in yogurt, prunes, raisins, cereals


    Happy Meal #4 - The Happy Rice Face
    Rice served with veggies and grilled salmon


    Happy Meal #5 - The Fruity Cars
    Apples,Cherry tomatoes, Japanese cucumber with veggie patty (refer here for veggie patty recipe http://food4littleones.blogspot.com/2012/06/veggie-patty-sandwich.html)


    Happy Meal #6 - Mr Bunny Face
    Instead of plain looking chicken rice, this will definitely spice up the appetite. Well, it worked for my Ethan, he actually ate up all by himself and asked me for more >:)


    Happy Meal #7 - Little Bears under Blueberries Rain
    Ethan decided to eat up all the blueberry raindrops first :)


    Happy Meal #8 - Happy Fish Sandwich
    Toasted wholemeal sandwich served with green apples and wholemeal cheerios. Those colorful flowers are marshmallows from grandma :)


    Happy Meal #9 - Geometry Castle
    Geometry Castle guarded by all the little animals, Ethan really loved this set and he insisted he must not eat the the sun as there is only 1 sun, once he ate there's no more. LOL, love his creative thought!


    Happy Meal #10 - Happy Sailing!
    Little animals sail the sea in their papaya boat. Noticed the strawberries lifesavers?

    Ethan can't wait to lay his hand on the papayas, I had to quickly snap this pic before I can hold him any longer..


    Happy Meal #11 - To The Sea!
    Little animal friends sail the rowdy sea of apples! Those tiny cheese fish biscuits contain natural coloring (as stated on the packaging) and the sail boat is just a slice of sandwich cut into uneven triangle shapes. I got my boy to help toasting the bread and spreading the jam this time, he was really excited to help up & told me his sandwich is yummy.. :)


    Happy Meal #12 - Banana Island
    All you need is really just the bananas... (this was an ad-hoc job while we were on a visit, so pardon the plain look!).

    As I'm preparing the Happy Meal only on weekends or when I'm off work, do look up for this post for updates from time to time :)

    Check out more Happy Meals here!

    Friday, November 9, 2012

    Homemade Rolled Sushi 简易手卷寿司

    Hub and I are both sushi lovers, I especially love mine with lots of wasabi :) My little boy enjoys sushi too as the rice are usually soft and easy to eat. Having 2 little ones now, sometimes we prefer dining at home than going out (the trouble of having to bring so many things...) So, since I knew this will probably be one of those days that we will be lazy to go out for dinner yet I'm craving for sushi, I decided to get all the ingredients needed for making sushi when doing my grocery shopping in the afternoon.

    So, all of us had a big plate of nice Japanese sushi served at the comfort of our home that night, with a pot of hot Chinese tea. It was a peaceful and cozy dinner with my baby girl freely exploring at the play area right next our dining table.

    Homemade Hand-rolled Sushi platter


    Homemade Hand-rolled Sushi platter again


    Grilled Salmon Bean curb with a dash of homemade anchovy powder (I made that for baby's porridge, you may refer to to recipe here on making the anchovy powder)


    Grilled Salmon rolled sushi & Sausage rolled sushi


    Here's how you do it..

    Preparation Time: 30 minutes
    Cooking Time: 10 minutes
    Serving: 3 seaweed sushi rolls and 3 sweet bean curbs sushi

    Ingredients:
    2 cups of calrose rice (pearl rice, 珍珠米, or use normal rice if you do not have this), soak in water for about 30 minutes and cooked as normal, let cold in a tray once done.
    3 table spoons of Japanese rice wine 日本寿司醋
    3 sheets of square seaweed sheet
    1 block salmon (about 250g), seasoned with salt (can substitute with canned tuna flakes too)
    1 piece of sausage
    1 Japanese cucumber, cut into long stripes of 1.5cm thickness
    1 ripe avocado, cut into long stripes of 1.5cm thickness
    2 eggs, beaten and seasoned with 1 teaspoon of Japanese soy sauce
    2 teaspoons of black sesame seed (I used organic sesame seeds)

    These are the ingredients... ready to roll!

    Equipment Needed:
    A bamboo sheet for rolling the sushi
    A bowl of clean water to wash your fingers (the rice can be sticky)


    The Methods:
    For the Rice
    1. In a shallow tray (I used glass baking tray), spread out the cooked rice and gradually add the rice wine into the rice. Mix eventually using a spatula and set aside.

    For the Fillings
    2. Heat up some oil in the frying pan, cook the salmon on medium heat approximately 3 minutes on each side until it turns light brown. Cook the sausage and beaten eggs.

    3. Cut all item in step 2 into long stripes, set aside.

    4. Lay a piece of the seaweed sheet onto the bamboo sheet (shiny side face downwards), drop a big scoop of rice onto the seaweed sheet and spread them out evenly.sprinkle with some black sesame seeds on top.

    5. Arrange the salmon, eggs, cut cucumber and avocado in the middle. Don't put too much as it can be difficult to roll.


    6. Lift the edge of the bamboo sheet and begin rolling the seaweed into a cylinder shape, pull the bamboo sheet lightly to tighten up the sushi roll. You should get a nice firm sushi roll like the one here.


    7. Using a clean knife, cut the sushi roll in half then into smaller pieces. Wipe clean the knife after each cut. Make sure you trim the edge for better presentation.


    8. Repeat same step but this time using sausage instead of salmon for variety of taste.


    Serve the sushi right away with wasabi and Japanese soy sauce, and they were Yummy...!

    My big guy was pleasantly surprised when he saw the sushi platter, little did he knew that this was not as difficult as it may seem. :)

    Happy rolling!


    Useful Tips to consider!

    • If your little one dislikes seaweed, serve the sushi in sweet bean curbs instead. You can buy the ready made from most supermarket like Jusco, Mercato.. My little loved his sushi and finished 2 rolls all by himself.
    • Have everything ready before you start rolling the sushi. Prepare a bowl of clean water next to you, wet your fingers before you work on the rice so it will not stick to your fingers.
    • Add a dash of anchovy powder for the added aroma and natural saltiness, you may refer to to recipe here.
    • Before cooking the calrose rice, soak them in water for about 30 minutes so the rice will turn out nice and soft. This was the rice I used.