Showing posts with label Fish. Show all posts

Saturday, July 9, 2016

Homemade Fishball and Fish Paste Rolls 手工鱼丸+鱼滑腐竹卷


This is one dish that I have attempted few times but without much success - it always turned out too soft or soggy, and once the texture was like taufu. >.<

Finally, I got it right after a very important tip that my mom in law shared with me... and this time, my fish balls turned out really nice! Chewy and fresh, absolutely no addictive and all natural. 

今次分享的这道菜肴是我家里小瓜们的挚爱,每次煮外卖的鱼丸或腐竹卷给他们吃,不管当天是煮饭或面,他俩都一定会把饭菜爬光光。

尝试了几次自己打鱼滑不成功后(不是太软就是像豆腐一样太散),总于下定决心请教了家婆(因为看到那菜市的胶鱼实在是太新鲜了!),得知自己原来一直以来忽略了一个好重要的步骤… 这次终于幸不辱命,鱼丸鱼滑腐竹卷成功完成,还很好吃呢!


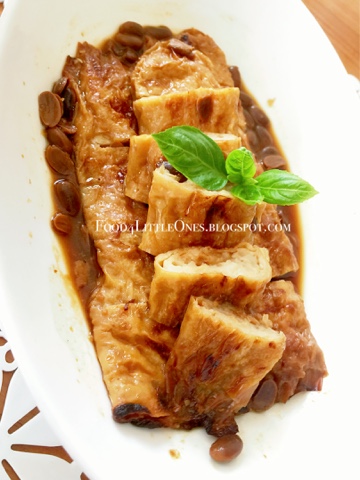
The fish paste beancurd rolls was a big hit with the kids, I should have made more instead of just 3 slices..


Ingredients:
Serving size: 20 fish balls & 3 rolls
Preparation time: 30 minutes
Cooking time: 25 minutes

• 2 medium size markarel fish about 400gm each 中型马鲛鱼两只共800克
• 1-2 teaspoon salt (adjust accordingly) 盐一至二茶匙(依照喜好调整)
• 1 tablespoon corn flour 黍粉一大匙
• 1 rice bowl ice water + 1 teaspoon salt* 冷水一碗,加一茶匙盐
• 3 raw beancurd sheets 生腐竹三片
• 3/4 tablespoon bean paste (I used Fairy brand, 仙女牌豆酱3/4大匙)

Important 要诀...
* ice water and corn flour are actually the key ingredients for a firm texture. Make sure you add few ice into the water. 秘诀来咯…那就是一定要用冷水和黍粉!这两个食材是不用添加物也可让鱼滑有弹性的关键。


The Making:

1. Clean the fish, rub salt all over the flesh. 拭干鱼肉,用手心把盐均匀抹上。


2. Scrap the flesh off the bone using a metal spoon (from tail to head direction). Collect the flesh in a big bowl, sprinkle with a teaspoon of salt and pepper to season. 用不锈钢汤匙,把鱼肉从尾到头刮下。鱼若是新鲜的话应该可以很轻易的刮下。把鱼肉集合在一个大碗里,加入盐和胡椒粉调味。


3. Mix a bowl of ice water (normal rice bowl size), dilute a teaspoon of salt in there. Keep adding scope of ice water over the fish paste and mixing in clock-wise direction until it is all well mixed and turns into paste form. Add the corn flour gradually, it helps to give a firmer texture to the fish paste. 在一个小饭碗里置入冰水(或加冰块),和一匙的蜀粉混合后。用汤匙把鱼肉往同一方向搅拌一边徐徐倒入冷水。直到鱼肉起胶,成粘稠状后即可以了。

4. Cover the fish paste with a cling film, keep them refrigerated for about 30 minutes. 把鱼滑用保鲜纸盖着,放在冰箱里冷却约三十分种左右。


5. Prepare a pot of anchovies fish stock, once the soup is boiling, add the fish paste (shape them individually  with a metal spoon) and let boil for about 3 minutes, or until the fish balls float in the soup (which indicates they are cooked). Scope them out and serve hot. 烧热一锅将鱼仔汤,水滚后加入鱼丸,煮约三分钟或看到鱼丸浮在水面即可。

For Fish Paste Beancurd Rolls 鱼滑腐竹卷


6. Lay out the beancurd sheet flat, scope fish paste and spread the rest out evenly over the sheet. 把腐竹片放平,用汤匙把鱼肉平铺在腐竹片上。鱼肉要薄要厚由的你咯,我就爱我的鱼肉满满的,一口咬下去超有满足感!


7. Using your fingers, carefully roll the sheet into a long cylindrical shape. 用手指把腐竹片卷成筒状。

8. Heat up 1 table spoon of cooking oil in a pan, cook the roll for about 3 minutes on each side or until golden brown. Add a cup of water and 3/4 tablespoon of bean paste (this is quite salty, do not over use!). Close the cover and let it simmer for about 3 minutes. If the sauce gets too thick or salty, add a bit more water. 在平底锅中烧热一大匙的油,把腐竹卷双面煎约三分钟(或呈金黄色)。加入3/4汤匙的豆酱和一碗水,盖上锅盖慢火煮约三分钟即可。如果酱汁太浓或太咸的话,可加入一点水调稀。

That's it, your fish paste beancurd rolls is done! Just cut it into thick slices and serve with noodles or rice, either way the kiddos love them. Enjoy.. ;-)
 把腐竹卷剪成几段,放上一搓九层塔当装饰即可上菜咯!


Tips to know 小叮咛...
When selecting fish, you may request the fishmonger to debone to safe some time.
If you can't find markerel fish, can go for white fish too. Do mention to the fish monger the fish is for making fish paste so he/she can suggest the correct fist. 
在选购鱼时,可以要求鱼贩帮忙把鱼去骨,省却处理时间。
如果没有新鲜的马胶鱼,也可以选择白鱼。但必须和鱼贩说明是打鱼滑用的。

Sunday, December 2, 2012

Rainbow Rice with Fish Nuggets 彩虹饭


Wouldn't it be nice to have your little ones running to the dinning table for dinner instead of having to drag them to take the meals, or having to keep reminding them to eat the food?

That was what happened when I told Ethan we are having Rainbow Rice for dinner. He rushed to the dinning table and offered to open up all the covers for me to reveal the rainbow rice underneath. He then happily ate his meal and kept telling daddy that rainbow rice will make him strong (coincidentally he was wearing a super hero pajamas, haha)

The Rainbow Rice set, with the bowl/cover on (it keeps the rice warm)


Ta da..

Saturday, December 1, 2012

Kids Meal: Happy Face Rice with Steamed Punters Fish


Here's a quick and healthy meal made for my duo today.

I made steamed Punters fish today, 1 fillet shared by mommy and the duo. It's really easy and delicious provided you use fresh fish, and must keep watch of time as you won't want to over-cook your fish.


Preparation Time: 5 min
Cooking Time: 5-8 min
Serving for: 2 little ones

Ingredients:
1 block fillet about 1" thick (Punters 马友鱼, Garoupa 石斑鱼, cod 鳕鱼, red snapper 红鳄鱼, these are among the fish with less bones)
5-10 slices of ginger
1/2 teaspoon of salt

For Seasoning (I exclude this for my baby):
1 teaspoon of premium soya sauce
Few drops of sesame oil


Step-by-Step Guides:
1. Clean the fillet, dap dry with kitchen towel and rub a thin layer of salt over it evenly using hands. Sprinkle the sliced gingers on top and set aside.

2. Boil a pot of water for the steamer, once water is boiled, place the fillet (with the plate) into the steamer.

3. Steam the fillet for 5-8 min (depending on thickness of the fillet) with the lid on. Once the meat turns white and the flakes can be separated with a fork easily, your fillet is ready.


4. When serving, add the seasoning on top (adjust according to your liking).


That's it, yummy steam fish in 4 simple steps!

Serve it along with rice and other food. I prepared stir fried onion and cucumber with scrambled eggs, so I made used of the eggs and cucumber to arrange a smiley face meal for my boy.

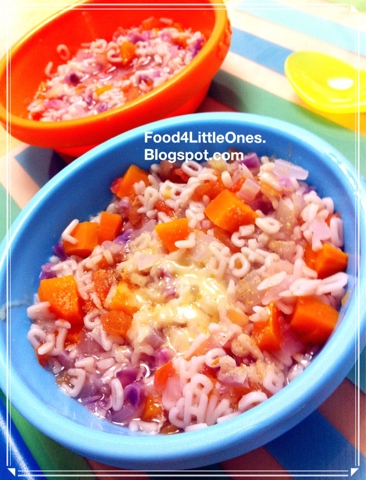
For my baby girl, I prepared this nutritious porridge with diced onion, carrots and Japanese cucumber. I mixed in the steamed fish only when feeding (I usually store the fish in a separate container for second feeding). She absolutely loved it and kept asking for more. :)


Simple, no fuss family meal. Anyone can do it. ;)

Thursday, November 22, 2012

Healthy Alphabet Pasta with Steamed Cod Fish 健康字母意粉


Tired of feeding your little ones with porridge, porridge and porridge all the time? Why not give it a change this time by introducing tiny alphabet organic pasta. It's yummy and give a different variety to little one's diet.

I cooked this for my 3.5 yo and 11.5mo today, both of them loved it and finished the entire bowl each. My elder boy had a bigger bowl of course. :)


A healthy meal for my precious duo - Organic Alphabet Pasta in vegetable soup.

My Little boy's portion, served with grated cheese and lightly flavored steamed cod fish fillet.


My baby girl's portion, without the grated cheese.


Only fresh ingredients are used in this recipe, no canned puree, no packaged stocks, only the good and natural stuff. Where possible, I try to avoid feeding canned / processed food to my baby especially when under 1 yo.

If you prefer tomato puree version, refer to my earlier post here.


Preparation Time: 10 min
Cooking Time: 15 min
Serving for: 2 little ones

Ingredients:
3 palmfull of alphabet pasta

For vegetable soup base:
- 1 palmful of purple cabbage, finely chopped
- 1 medium carrot, diced
- 1 palmful of pumpkin, diced (I skipped this as I ran out of pumpkin)
- 1/2 medium onion, finely chopped
- 1/2 medium tomatoes, diced
- 1 teaspoon of anchovy powder (refer here for recipe)
- 1 big table spoon of grated cheddar cheese

For Vegetarian version, skip the following ingredients.

For Steamed Cod Fish
- 1 block of cold fish fillet, about 200gm, completely defrost
- A few slices of ginger


Note: you may change the choice of vegetable but tomatoes and carrots shall remain.

The Making:
1. Boil a pot of water (about 4 small rice bowls), once boiled, add all the vegetables. Close the lid and let it shimmer for about 5 minutes. You can add some salt into the soup, but I skipped that as I'm using anchovy powder.

2. In the meanwhile, clean the cod fish,lightly coat with salt and sprinkle with the slice ginger. This is to avoid the fishy smell.

3. Add the alphabet pasta into the soup. Let it boils for 10 minute (or as per the cooking time indicated on the packaging)

4. While the pasta is boiling in the pot, steam the cod fish in a steamer on top of the pot of soup for 5 minutes (if the fillet is thicker than 1", steam slightly longer). You can also stem the fish on a separate pot but this is most time and energy efficient way :)

Note: Use a chopstick or fork to test that the fish is cooked - once it can be easily separated when poked, the fish is ready.

5. Turn off the stove. Sprinkle with some anchovy powder.

6. Serve pasta in a shallow dish, add a big spoonful of grated cheddar cheese on top for added taste and nutrition.

7. Lay the steamed cod fish on top. For elder toddler (above 2 yo), add a few drops of light soya sauce and sesame oil to add flavor for the fish.


The pasta taste best when serve hot, as the cheese will melt in the pasta and give it a nice natural aroma.


This is the organic pasta I used for this post.

Useful tips!
1. Some infants may be allergic to cheese, so for first time feeding, give a small amount and observe for possible allergy sign such as rashes, itchiness etc.

2. For baby between 8mo-12mo, you can boil the soup base for slightly longer so the carrots are thoroughly soften.


A Note about Salt in Baby's Food
Most if not all books and sites I read advised against adding salt, sugar or any artificial flavoring into baby's food, this is to avoid them from becoming a picky eater at young age and most importantly, for health reason. Excess salt may be harmful to baby's kidney at such young age and some processed food already contain certain amount of salt in them.

I have did some reading about salt & sodium for little ones, do read on more here if you are interested..


C'ya!

Monday, November 12, 2012

Pan Fried Teriyaki Salmon with Noodle in Dark Sauce 日酱三文鱼拌干捞面


Are you a noodle lover? I am, so is my little boy and my big guy. I stock up a few types of noodles for days when I crave for simple noodle meal at home. From All-Eggs noodle (全蛋面), Yang Chun noodle (阳春面) and dried scallop noodle (干瑶柱面), I seek for noodles that are non deep fried and if possible, are organic. In KL, stores like The Organic Farm, Village Grocers provides pretty good selection of organic noodles.

This is my version of dried noodle in dark sauce, or you can call this Gan-Lao Mian like how the locals call it. :)


Little one's portion, arranged to resemble Earth with all salmon flakes arranged in the middle.


Ethan loved his noodle. He gave me a thumb up upon first spoonful and happily ate up his portion.

On any other day. I would have served this noodle with barbecue pork loin, char siew, however since I was out of pork loin so salmon seem like a good nutritious substitute. I was also out of bak Choy (小白菜) so used broccoli and carrots instead. You may refer to the sautéed vegetables recipe here.


Preparation Time: 5 min
Cooking Time: 15 min
Serving for: 2 adult + 1 LO (little one)

Ingredients:
For the Noodle:
3 balls of noodles of your choice

Ingredient A (noodle's sauce):
1 table spoon of dark soya sauce 黑酱油
2 table spoon of light soya sauce 酱油
1 table spoon of sesame oil 芝麻油
1 tea spoon of white pepper 胡椒粉

For the Salmon:
200gm fresh salmon block, fully defrost, clean and rub with salt.

Ingredient B (salmon's marinate):
4 table spoon of Teriyaki sauce
1 garlic, finely chopped


Step-by-Step Guides:
1. Marinate the salmon with ingredient B in a deep bowl or a zip lock bag. Cover well and keep refrigerated for about 30 minutes.


2. In a non stick pan, heat up a small tea spoon of olive oil and spread it around the pan. Salmon produces a lot of oil during cooking so it's not necessary to use much oil. This is just to create a coating to ensure the fish will not stick to the pan.

3. Fry the salmon on medium heat fot about 3-5 minutes on each side, depending on thickness. Do not over cook or it may have a bitter after taste. Refrain yourself from flipping the salmon too early if you want it retain in one nice piece after cook.


4. Remove salmon from pan, keep warm.

4. Cook a pot of boiling water (just enough to cover the noodles). Add a dash of salt. Once water is boiled, toss in the noodles and cook for 2-3 minutes, based on the time indicated on the packaging. Spread out the noodle using a pair of chopsticks.

5. While the noodle is cooking, mix all ingredient A in a large bowl.


6. Once noodle is cooked, drain all excess water and add it into the sauce. Mix well.


7. Your food is ready, serve immediately.

Bon appetite! :)


This was the noodle I used for making today's dish...


Useful Tips!
For little ones, press the salmon into flakes using a fork and top onto the noodle. Besides, you may want to cut the noodles shorter so it is easier for little hands to handle.

Friday, November 9, 2012

Homemade Rolled Sushi 简易手卷寿司

Hub and I are both sushi lovers, I especially love mine with lots of wasabi :) My little boy enjoys sushi too as the rice are usually soft and easy to eat. Having 2 little ones now, sometimes we prefer dining at home than going out (the trouble of having to bring so many things...) So, since I knew this will probably be one of those days that we will be lazy to go out for dinner yet I'm craving for sushi, I decided to get all the ingredients needed for making sushi when doing my grocery shopping in the afternoon.

So, all of us had a big plate of nice Japanese sushi served at the comfort of our home that night, with a pot of hot Chinese tea. It was a peaceful and cozy dinner with my baby girl freely exploring at the play area right next our dining table.

Homemade Hand-rolled Sushi platter


Homemade Hand-rolled Sushi platter again


Grilled Salmon Bean curb with a dash of homemade anchovy powder (I made that for baby's porridge, you may refer to to recipe here on making the anchovy powder)


Grilled Salmon rolled sushi & Sausage rolled sushi


Here's how you do it..

Preparation Time: 30 minutes
Cooking Time: 10 minutes
Serving: 3 seaweed sushi rolls and 3 sweet bean curbs sushi

Ingredients:
2 cups of calrose rice (pearl rice, 珍珠米, or use normal rice if you do not have this), soak in water for about 30 minutes and cooked as normal, let cold in a tray once done.
3 table spoons of Japanese rice wine 日本寿司醋
3 sheets of square seaweed sheet
1 block salmon (about 250g), seasoned with salt (can substitute with canned tuna flakes too)
1 piece of sausage
1 Japanese cucumber, cut into long stripes of 1.5cm thickness
1 ripe avocado, cut into long stripes of 1.5cm thickness
2 eggs, beaten and seasoned with 1 teaspoon of Japanese soy sauce
2 teaspoons of black sesame seed (I used organic sesame seeds)

These are the ingredients... ready to roll!

Equipment Needed:
A bamboo sheet for rolling the sushi
A bowl of clean water to wash your fingers (the rice can be sticky)


The Methods:
For the Rice
1. In a shallow tray (I used glass baking tray), spread out the cooked rice and gradually add the rice wine into the rice. Mix eventually using a spatula and set aside.

For the Fillings
2. Heat up some oil in the frying pan, cook the salmon on medium heat approximately 3 minutes on each side until it turns light brown. Cook the sausage and beaten eggs.

3. Cut all item in step 2 into long stripes, set aside.

4. Lay a piece of the seaweed sheet onto the bamboo sheet (shiny side face downwards), drop a big scoop of rice onto the seaweed sheet and spread them out evenly.sprinkle with some black sesame seeds on top.

5. Arrange the salmon, eggs, cut cucumber and avocado in the middle. Don't put too much as it can be difficult to roll.


6. Lift the edge of the bamboo sheet and begin rolling the seaweed into a cylinder shape, pull the bamboo sheet lightly to tighten up the sushi roll. You should get a nice firm sushi roll like the one here.


7. Using a clean knife, cut the sushi roll in half then into smaller pieces. Wipe clean the knife after each cut. Make sure you trim the edge for better presentation.


8. Repeat same step but this time using sausage instead of salmon for variety of taste.


Serve the sushi right away with wasabi and Japanese soy sauce, and they were Yummy...!

My big guy was pleasantly surprised when he saw the sushi platter, little did he knew that this was not as difficult as it may seem. :)

Happy rolling!


Useful Tips to consider!

  • If your little one dislikes seaweed, serve the sushi in sweet bean curbs instead. You can buy the ready made from most supermarket like Jusco, Mercato.. My little loved his sushi and finished 2 rolls all by himself.
  • Have everything ready before you start rolling the sushi. Prepare a bowl of clean water next to you, wet your fingers before you work on the rice so it will not stick to your fingers.
  • Add a dash of anchovy powder for the added aroma and natural saltiness, you may refer to to recipe here.
  • Before cooking the calrose rice, soak them in water for about 30 minutes so the rice will turn out nice and soft. This was the rice I used.


Friday, October 26, 2012

Roasted Dried Achovies Powder 江鱼仔粉末


*updated with pictorial guide*
I made these anchovies powder for baby C's porridge few weeks ago, been too busy lately that I have no time to write about it. Besides, I would like to find out more about the benefits of anchovies before sharing it with others.

Anchovies are commonly known as ikan bilis to the locals, dried anchovies with head and tail attached are commonly available in most hypermarkets or wet markets, and come in different grades depending on the size and types of fish used.


Some of the known benefits of anchovies:

  • Despite its tiny size, anchovies is packed with nutrients: iron, calcium (as it can be consumed with edible bones), protein and omega-3 fatty acids.
  • Due to the small size which translate to relatively shorter life cycle , it’s possibly less prone to heavy metal contamination in the ocean unlike other bigger fish.
  • However, due to the high sodium content, I soak and wash the anchovies to wash away some of the salt content before cooking them. This also removes any potential dust or dirt residues on the anchovies. Besides, most articles I read encourage removing the head and entrails which have higher content of cholesterol.


Apart from the benefits listed the above, other reasons why I choose to make anchovies powder for my baby:
  • It's convenient, especially on days where I am out of the house with baby the whole day. Once blended, the anchovies powder can be stored in air tight container for a month or more.
  • It adds taste and nutrient into the porridge. When going out with baby C, I usually put 1/4 tea spoon of powder into a container and add them into the porridge right before serving. The porridge smells and tastes so nice that even I like them :)


So, what do I used the anchovies powder for?
I usually add about 1/4 tea spoon of the anchovies powder into a small rice bowl of porridge for taste. You may also use the powder on fried rice, sushi, sandwiches or even soup for a richer aroma. I prefer using this homemade flavoring than those commercially packed chicken stock which I am sure is full of preservative and MSG. No food is better than homecook food. :)


Preparation Time: 5min
Cooking Time: 10-15min
Recommended age: 8 months onwards

Ingredients:
500gm of Dried anchovies just like in picture below, about 5 palms full (enough for a month's usage).


Step-by-Step Guides:

1. Preheat oven to 120c/140c (gas/fan).

2. Wash the anchovies, remove the heads and tails (I bought those that had the heads and tails removed, save a lot of time). Dab the fish using a kitchen towel to remove as much access water as possible and spread them out evenly onto a baking tray


3. Roast the anchovies in the oven for 15-20 minutes. You can open the oven to check the fish, once it's golden crisp you may remove them from the oven. Let it cool before blending them.

I got 2 full jars of these crunchy anchovies.


4. In a food processor / blender, blend the roasted anchovies into powdery form.


The anchovies powder can be stored in air-tight container for up to a month or more. Keep it in a cool and dry place for longer shelve life. I placed mine in a clear glass container and stored in the fridge to ensure freshness.


Reference Links:
These are some of the websites I referred to, for your reference only.

http://www.moh.gov.my/images/gallery/Garispanduan/diet/km6.pdf
http://www.asiaone.com/Health/Eat%2BRight/Story/A1Story20090409-134369.html
http://www.menshealth.com.sg/weight-loss-nutrition/ikan-bilis-protein-rich

Until the next post, happy feeding! :)

Wednesday, August 22, 2012

Simple Dory Fish Nuggets 香煎鱼块


Ethan loves McDonald's chicken nuggets, well, me too. Instead of going to McD for breakfast, I decided to prepare some homemade nuggets for breakfast. Since I'm out of chicken fillet, the frozen dory fish fillets came in handy.

With a little decoration, my little boy thoroughly enjoyed his homemade Happy Meal and he actually thank me after finishing his breakfast.. :)

Kiddie Meal for Ethan, decorated with mini cucumbers and cherries. He absolutely loved this :)


Preparation Time: 10 min
Cooking Time: 10 min
Serving for: 10-12 nuggets


Ingredients
500 gm dory fish fillets, completely defrost and pat dry
1 cup bread crumbs
1 egg, beaten
1 teaspoon of fresh or dried basil leaves
Dash of salt and pepper
Dash of worcestershire sauce (I used Lea & Perrins)

Step-by-Step Guides
1. Put the beaten egg in a shallow bowl and bread crumb spread out evenly on a plate. Set aside.
2. Cut the fish fillet into long rectangular shape, season with basil leaves, salt and pepper. Coat the fish nuggets evenly with egg, follow by bread crumbs.
3. Heat up 2 spoonful of olive oil in a frying pan, put the nuggets one by one. Make sure they do not overlap. Cook each side for about 3-5 minutes or until golden brown, refrain from turning the nuggets too soon.
4. Absorb excess oil from the nuggets using a kitchen paper and serve as is or with your favorite sauce.

For little Ethan, I assembled the nuggets into tree trunks with some cherries and baby cucumbers as fruits and leaves. Aren't they looking cute? :)


Suggestion: Toasted Cheesy Fillet Sandwich
Add fillet to the sandwich bread with a slice of cheese, toast it on 160c for 8 minutes and you get a yummy sandwich. :)


Useful Tips!
1. Before coating the fish nuggets with eggs and bread crumb, make sure to pat dry using kitchen paper so you won't get oil splashing all over when frying.

The breakfast for me and my Big Guy. Dory Fillet served over omelette and fresh fruits.

Toasted Cheesy Dory Fish Sandwich for a full breakfast.

Marinating the fillet with salt, pepper, fresh basil leaves and worcestershire sauce.
Put the 2 plates of eggs and bread crumb side-by-side, easier for coating.
Pan frying the fillet.