Showing posts with label 3 Years Onward. Show all posts

Sunday, August 28, 2016

Dreamy Violet Jelly Mooncake 紫色浪漫啫喱月饼


It's almost time for Mid Autume festival. Whether or not you are celebrating this festive day - it's a day where family reunited and there are various folktales that evolve around it; it has become a season for everyone to enjoy mooncakes. Traditional style, snow skin, lotus, bean paste, mixed nuts, tiramisu, chocolate, fruity, charcoal, jelly... There are abundant of varieties to choose from!

I'm not exactly a mooncake lover, but I would like for my kiddos to continue the tradition and know the reason behind the celebration. So I made mooncakes to celebrate with them every year, and this time round, I came up with these beautiful dreamy violet color jelly mooncakes. They absolutely loved it! 💜

Aren't they beautiful?


The color is absolutely gorgeous and it's as natural as can be, without any artificial coloring.

Thanks to my blue or flowers, or commonly known as "Bunga Telang", 兰花. 


Daily harvest from my single plant.


The Making:
• 1 packet jelly powder 
• 180g of white sugar
• 1L of plain water
• 8-12 petals of blue pea flowers 
• 1 lemon wedge (optional)


1. Mix 1L of water with 1 packet of jelly powder (agar-agar) and 180g of white sugar (reduced from original 250g), and bring to boil. 

2. Add in 8 petals of blue pea flowers. Stir occasionally until the jelly powder is fully dissolved.

Now, if you like it blue, just scope the liquid into the jelly mould directly.

However, if you like it violet like mine, just add a few drops of lemon juice. A small slice of lemon be sufficient.

3. Scoop the liquid into jelly mould, let cool to room temperature before moving them into the refrigerator. I added a few flower petals into each of the mould for decoration. Simply adore the dreamy feel they present.

Enjoy & have a wonderful Mid-Autume Frstival... 中秋节快乐!

Saturday, July 9, 2016

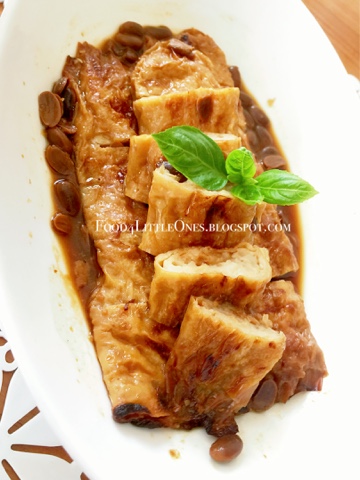
Homemade Fishball and Fish Paste Rolls 手工鱼丸+鱼滑腐竹卷


This is one dish that I have attempted few times but without much success - it always turned out too soft or soggy, and once the texture was like taufu. >.<

Finally, I got it right after a very important tip that my mom in law shared with me... and this time, my fish balls turned out really nice! Chewy and fresh, absolutely no addictive and all natural. 

今次分享的这道菜肴是我家里小瓜们的挚爱,每次煮外卖的鱼丸或腐竹卷给他们吃,不管当天是煮饭或面,他俩都一定会把饭菜爬光光。

尝试了几次自己打鱼滑不成功后(不是太软就是像豆腐一样太散),总于下定决心请教了家婆(因为看到那菜市的胶鱼实在是太新鲜了!),得知自己原来一直以来忽略了一个好重要的步骤… 这次终于幸不辱命,鱼丸鱼滑腐竹卷成功完成,还很好吃呢!


The fish paste beancurd rolls was a big hit with the kids, I should have made more instead of just 3 slices..


Ingredients:
Serving size: 20 fish balls & 3 rolls
Preparation time: 30 minutes
Cooking time: 25 minutes

• 2 medium size markarel fish about 400gm each 中型马鲛鱼两只共800克
• 1-2 teaspoon salt (adjust accordingly) 盐一至二茶匙(依照喜好调整)
• 1 tablespoon corn flour 黍粉一大匙
• 1 rice bowl ice water + 1 teaspoon salt* 冷水一碗,加一茶匙盐
• 3 raw beancurd sheets 生腐竹三片
• 3/4 tablespoon bean paste (I used Fairy brand, 仙女牌豆酱3/4大匙)

Important 要诀...
* ice water and corn flour are actually the key ingredients for a firm texture. Make sure you add few ice into the water. 秘诀来咯…那就是一定要用冷水和黍粉!这两个食材是不用添加物也可让鱼滑有弹性的关键。


The Making:

1. Clean the fish, rub salt all over the flesh. 拭干鱼肉,用手心把盐均匀抹上。


2. Scrap the flesh off the bone using a metal spoon (from tail to head direction). Collect the flesh in a big bowl, sprinkle with a teaspoon of salt and pepper to season. 用不锈钢汤匙,把鱼肉从尾到头刮下。鱼若是新鲜的话应该可以很轻易的刮下。把鱼肉集合在一个大碗里,加入盐和胡椒粉调味。


3. Mix a bowl of ice water (normal rice bowl size), dilute a teaspoon of salt in there. Keep adding scope of ice water over the fish paste and mixing in clock-wise direction until it is all well mixed and turns into paste form. Add the corn flour gradually, it helps to give a firmer texture to the fish paste. 在一个小饭碗里置入冰水(或加冰块),和一匙的蜀粉混合后。用汤匙把鱼肉往同一方向搅拌一边徐徐倒入冷水。直到鱼肉起胶,成粘稠状后即可以了。

4. Cover the fish paste with a cling film, keep them refrigerated for about 30 minutes. 把鱼滑用保鲜纸盖着,放在冰箱里冷却约三十分种左右。


5. Prepare a pot of anchovies fish stock, once the soup is boiling, add the fish paste (shape them individually  with a metal spoon) and let boil for about 3 minutes, or until the fish balls float in the soup (which indicates they are cooked). Scope them out and serve hot. 烧热一锅将鱼仔汤,水滚后加入鱼丸,煮约三分钟或看到鱼丸浮在水面即可。

For Fish Paste Beancurd Rolls 鱼滑腐竹卷


6. Lay out the beancurd sheet flat, scope fish paste and spread the rest out evenly over the sheet. 把腐竹片放平,用汤匙把鱼肉平铺在腐竹片上。鱼肉要薄要厚由的你咯,我就爱我的鱼肉满满的,一口咬下去超有满足感!


7. Using your fingers, carefully roll the sheet into a long cylindrical shape. 用手指把腐竹片卷成筒状。

8. Heat up 1 table spoon of cooking oil in a pan, cook the roll for about 3 minutes on each side or until golden brown. Add a cup of water and 3/4 tablespoon of bean paste (this is quite salty, do not over use!). Close the cover and let it simmer for about 3 minutes. If the sauce gets too thick or salty, add a bit more water. 在平底锅中烧热一大匙的油,把腐竹卷双面煎约三分钟(或呈金黄色)。加入3/4汤匙的豆酱和一碗水,盖上锅盖慢火煮约三分钟即可。如果酱汁太浓或太咸的话,可加入一点水调稀。

That's it, your fish paste beancurd rolls is done! Just cut it into thick slices and serve with noodles or rice, either way the kiddos love them. Enjoy.. ;-)
 把腐竹卷剪成几段,放上一搓九层塔当装饰即可上菜咯!


Tips to know 小叮咛...
When selecting fish, you may request the fishmonger to debone to safe some time.
If you can't find markerel fish, can go for white fish too. Do mention to the fish monger the fish is for making fish paste so he/she can suggest the correct fist. 
在选购鱼时,可以要求鱼贩帮忙把鱼去骨,省却处理时间。
如果没有新鲜的马胶鱼,也可以选择白鱼。但必须和鱼贩说明是打鱼滑用的。

Sunday, February 21, 2016

Double Style Sesame Chicken Nuggets


This is a fast and easy dish that is crunchlicious and suitable for any occasion, be it family dinner, friends gathering or even picnic. The white sesame coating over the nuggets adds a subtle aroma and adds to the crunchiness. 

Why double style? I made a non spicy version (sesame) and a spicy version (sesame + paprika), everyone can just pick their favorites, or have both. ;)

Served the Sesame Chicken Nuggets with 3 different sauces, so there's at least a flavor that suits everyone :- hot Sambal, Sesame sauce and mayonnaise.


I had it served as part of our family's CNY luncheon. The whole big plate was emptied before the lunch was over.


Preparation Time: 10 minutes
Cooking Time: 30 minutes
Serving for: approximate 40-50 nuggets

Ingredients:
• 800gm chicken fillets, cut into cubes

For Seasoning:
• salt and pepper  
• few drops of sesame oil
• 1 tablespoon of Shao Xin wine (skip if serving for young kids)

For Coating:
• 4 tablespoon of flour + 1 tablespoon of cornflour
• 2 egg whites
• 1/2 cup of white sesame seeds

For Hot version:
• few dash of paprika powder 
 
The Making:
1. Marinate the chicken nuggets with the salt, sesame oil and Shao Xin wine. Set aside for about 30minutes.

2. Coat the chicken nuggets with the following in sequence: 1) mixed flour 2) egg white 3) white sesame seeds. 

For the hot version, add few dash of Paprika powder into the flour and mix well.


3. Heat up few spoonful of cooking oil in a frying pan. Once the oil in heated, using a pair of long chopsticks or thong, slowly place the chicken nuggets into the pan; you may cook few nuggets at the same time, just make sure they do not overlap.

4. Cook each nuggets for about 1 minute on each side or until golden brown. Dish out and put over a piece of kitchen towel to absorb the excess oil.

Serve alongside your favorite sauce (tomato ketchup, chili sauce, Sambal chili, mayonnaise, peanut sauce, sesame sauce). Enjoy!

Thursday, January 14, 2016

Easy Japanese Tamago Sushi (Sweetened Egg Rolls)


It's been a while since we last had any Japanese meal at home, I decided to surprise the little ones by making some of their favorite sushi - sweet beancurds, Tamago and teriyaki salmon, serve with a pot of home brewed mint tea - mix of spearmint, peppermint, Indian borage and lemon.

I bought the sweet beancurd from Aeon mall @ RM7.90 for 6 pieces, but for the Tamago, a kind of sweetened Japanese egg rolls, I decided to make it myself as I often find the store made too sweet.

My grill pan is my best companion now. Cook all these with just 1 pan (and rice cooker for the sushi rice), washing is minimal and save me so much time!


Simple Jappy lunch, for the 3 of us.


While I was preparing the tea, E decided to surprise me with his food art. Lol, what a cute old man!


Making of the Tamago sushi is easy...

Preparation: 10 minutes
Cooking time: 15 minutes
Serving for: approximate 10-12 Tamago sushi 

Ingredients:
Tamago
• 4 eggs
• 1 teaspoon mirin (Japanese vinegar)
• 1 teaspoon soyu (sushi sauce)
• 1 teaspoon sugar (can add more up to 1 tablespoon)

Sushi Rice
• 1 cup Pearl rice (short grain rice)
• 2 cups water
• 1 tablespoon mirin 


The Making:

1. Wash the rice and cook as usual (1 cup rice to 2 cups water). Once done, let the rice rest for about 10 min in the pot then scope out to let cold down.

2. While the rice is cooking, beat the eggs lightly. Add the rest of the ingredients, beat lightly to mix well.

3. Using a square pan (I used my grill pan), pour the egg mixture, slowly fold inward using a spatula until it forms a roll.

4. Let it cook for about a minute, move the egg roll to a clean cutting board and cut into equal slices of about 1" thick each.

5. Mix the mirin into the rice, mix well using a spatula then shape them into rolls of equal size using your palms.

Serve the egg rolls on sushi rolled rice (wrap with some cut seaweed sheet if you have any, I forgot to buy them!) or with sliced cucumbers, prepare some Japanese soya sauce for dipping. That's it, you are done!

Itadakimasu!

Need more idea for sushi? Refer to my previous post here. The kiddos love any kind of sushi as long as they are mommy made.

Psss... This is also ideal to be packed for their school lunch box ;-)

Thursday, December 24, 2015

Simplest Mango Mousse (2 Ingredients only!)


This is one of the easiest desserts I have ever made, just require 2 ingredients and it taste great. Besides, the recipe is so easy that you would never forget, just 1 part whipping cream to 1.5 part of mango purée. Almost dummy-proof huh? *laugh*


Ready to make some? Here we go..

Preparation time: 30 minutes
Chilling time: 30-60 minutes
Serving for: 4-6 pax

Ingredients:
• 1 cup whipping / heavy cream
• 1.5 cup mango purée
• additional mango cubes for topping


Note: I used 1 1/2 mango of the above size (as in picture), you may add 1-3 teaspoon of sugar if you like, but since the mango i got is ripe and sweet, I opted to go without extra sugar.


The Making:

1. Cut mango into small cubes, blend on high speed for about 15 seconds until it turns purée.

2. Using a mixer, whisk the whipping cream on high speed until it is stiff (no longer in liquid form, takes about 1 minute of whisking if using machine, probably a lot longer if using hand). Add in the mango purée and whisk to mix well.

3. Pour into a clear container, refrigerate for at least 30 minutes before serving.

When serving, add additional mango purée and mango cubes on top the mango mousse, it's simply delicious that even my in law approved it! *wink*

Tuesday, July 14, 2015

Abalone Soup Noodle with Bean Curds 鲍鱼汁捞面,好好吃


bilingual | 双语版


I found a leftover can of NZ Wild abalone which I bought during Chinese New Year, we were not exactly in the mood to celebrate when my late mom departed us during CNY, so it had been left idle in the kitchen shelf for months.

Anyway, I decided to make a quick but luxury meal - canned abalone soup noodle, with broccoli and bean curds, and the kiddos absolutely loved them. E finished his bowl of noodle in record fast time (like 3 minutes?!) and instantly asked for a second bowl. So I quickly cooked another fresh batch of noodle, which only took me 3 minutes, topped with some soup and wa-lah, he finished it within minutes. If only he eats this fast everyday. :)

Our serving. Kids have theirs without the abalone slices, as its too chewy for their liking. You can try to cut the abalone into small dice and the kids may be able to enjoy it.  


The wild abalone I used, slightly smaller than a palm size. Got this from Soon Thye Hang during their CNY promo, you may checkout their website for a branch near you.

Preparation time: 10 min 十分钟准备
Cooking time: 10 min 十分钟烹煮
Serving for: approximate 4 pax 越四人份


Ingredients 材料:
• 1 canned abalone in clear stock 清汤鲍鱼一罐 (红烧也可)
• 1 stalk broccoli, cut small 西兰花一棵,切小段
• 1 carrot, cut flora / round shape 红萝卜一个,切片/花状
• 12 slices bean curd 豆腐皮数片
• 12 flat noodles 扁面条12个左右
• Water half cup 水半杯

We like this organic flat soya noodle, has a nice scent and not too soft to bite. 
我家爱吃这有机黄豆面条,有淡淡的豆香又不会太软。

The Making 做法:

1. Boil a pot of water (just enough to cover the broccoli), cook the broccoli and carrots for about 2 minutes, scope aside.

用中型锅煮滚水后,放入西兰花和红萝卜烫熟 (越两分钟),捞起待用。

2. Toss the noodles into the boiling water, cook for 3 minutes, or as per the time indicated on the packaging. Scoop the noodles, lightly soak in a bowl of cold water, then equally distribute them in the dinner plates. 

用同一个锅把面条煮熟(三分钟左右),捞起,过冷河,适量分布在碟子里。

3. When the noodle is cooking, use a wok, heat up the abalone sauce (DONT cook the abalone!), add half cup of water as the sauce is quite salty. Once bubbles are forming, toss in the broccoli, carrots and beancurd. Let it simmer for about 1-2 minutes. 

在煮面条同时,烧热锅,把鲍鱼汁加小半杯水煮滚后,置入红萝卜,西兰花和豆腐皮,滚越一至二分钟,熄火。


4. Scoop the soup and cooked veggies over the noodles, top with abalone slices, serve hot and enjoy!

把热鲍鱼汁和料倒在面条上,把切好的鲍鱼片摆在面上,热腾腾的鲍鱼捞面即可上桌!


IMPORTANT: Abalone is a type of Mollusca which falls under the shellfish family (like clams, scallops), so there is a risk of allergy reaction. Please be cautious when introducing to young toddler for the first time and do avoid introducing to little ones below 2yo if possible. Afterall canned abalone is a processed food and contains preservative.


注意事项: 鲍鱼属于贝壳类(像蚵,扇贝),部分人可能会有过敏反应,小朋友如果是第一次尝试的话要注意是否有过敏反应。我个人不建议给两岁以下的孩童食用, 而且罐头食品始终难免有防腐剂和较重的调味料。


Useful Tips 小提示…

• The abalone sauce is very rich in taste and I find it rather salty, so I added some water to dilute it. Adjust it according to your personal liking. 

我个人觉得鲍鱼汁太重味了,所以加入少许水调稀,你可依照你的味蕾来调整。

• You may serve this dish as a main dish without the noodle but add on some mushrooms, it is actually one of the favorite CNY dishes during Chinese family's reunion dinner which signifies a wealthy life ("Bao" in the abalone means full or filled)

在汤汁里加入几颗冬菇,省略面条,这也是道很道地的新年佳肴之一。鲍鱼鲍鱼,让你年年饱满哦…

Saturday, July 11, 2015

{Breadmaker recipe} Easy Peasy Homemade Pizza


Only have an hour to prepare dinner? What about some homemade pizza? We had ours ready in slightly more than an hour, and that's because I let the duo helped out, otherwise it would have been much faster.. 

Pineapple Cured Ham, Button Mushrooms & Bell Pepper Pizza

Tuna Pizza & Cherry Tomato Pizza

This recipe uses my Panasonic breadmaker, but you can do it without a machine too.


Ingredients for pizza dough:
• 280g high protein / high gluten flour
• 15g unsalted butter
• 2 teaspoons sugar (optional)
• 1 teaspoon salt
• 190ml water
• 1 teaspoon instant yeast

Pizza Toppings - as per picture below:

The Making:

1. Drop all ingredients into the breadmaker pan as per listed sequence, yeast in separate yeast drop compartment, then select "Dough" menu (#9 on Panasonic), the dough shall be ready in 45 minutes.

For mixer method, refer here thin crust sausage pizza.

2. Once done, remove dough from pan immediately, or you may leave it in the pan if you want to let it ferment (that will be ideal for thick pizza) 

3. Preheat oven to 210°c.

4. Using a rolling pin, spread out the pizza dough to 2 large rectangular or circulr shapes, spread with a layer of tomato purée then follow by the filling of your choice (ham, bacon, salami, mushrooms, bell peppers, cherry tomato etc), top with loads of shredded mozzarella cheese and Parmesan cheese. I sprinkled some fresh parsley leaves too.

Ready for bake.

5. Bake each pizza for 12-15 minutes or until golden brown. Let it cool down slightly then cut with a pizza cutter.

I made some fresh garden salad with roasted sesame dressing... Sprinkled with lots of roasted almond flakes for extra crunchiness, cranberries & golden raisins for natural sweetness. Never a meal without some fresh veggies :) 


Bon appetite!

Friday, June 12, 2015

Best Homemade Roast Pork Belly Char Siew! 秘制叉烧

When I first started this blog,  it was with a simple mission - to share baby friendly recipes with my friends. I did not expect it will grow to over 1000 fans on Facebook and attracted over 230,000 visitors to this site. I'm humbly thankful.

To show my appreciation, I'm sharing this Best Homemade Char Siew, a family recipe as taught by my mother in law, who is truly a great chef!  I also included the special hot sauce recipe as taught by my late mom, and they are simply perfect match..


Preparing time: 25 minutes
Cooking time: 45 minutes

Ingredients:
This recipe makes 3 slices of roasted pork belly. 

A) Ingredients
3 blocks of pork bellies, about 30cm each. 3层肉,中段,大概30公分
Sea salt 1/2 bs per meat 海盐 半大匙
White pepper few dashes 白糊椒 适量
Cinnamon powder few dashes桂末粉 适量

B) Marinate Sauce 
Dark soy sauce x 1 tablespoon 黑浆油 一大匙
Soya sauce x 2 tablespoon 生抽 两大匙
Shao yin wine x 2 tablespoon 绍兴酒 两大匙
Sesame sauce x 2 tablespoon 芝麻浆 两大匙
Sugar x 2 tablespoon 糖 两大匙

C) Chili dipping sauce 辣椒酱
5 large Red chili 红辣椒5瓣
3 small chili padi (only if like it extra spicy) 小辣椒3瓣 (不嗜辣的话,可免)
1 whole Garlic, removed skin 蒜头一棵
3 lime, juiced 酸甘3粒
1 teaspoon rice vinegar 白醋一茶匙
1 thumb young ginger  嫩姜拇指般大
1 teaspoon sugar 一茶匙糖
1 tablespoon Thai chili sauce or Maggie chili sauce 一茶匙泰国/美极辣椒酱 


The Making:

1. Rub seasoning in A) over meat evenly in listed sequence 把调味料A)依序均匀搽在猪肉上。

2. Mix ingredient B) in a sauce bowl and stir evenly. Rub all over the meat using your hand. 用一个小碗,把材料B混均,搽在猪肉上。

3. Wrap the meat with polyester foam and keep refrigerated for 3 hour.把腌好的猪肉用保鲜纸包着,放在冰箱里三小时以入味。

4. Cook in oven/broiler at 245°c / 475°f. Ensure rest the meat on a rack to let the oil drip from the meat as it cooks. Cook for 30 min on top then turn the meat over, cook for another 15 min. Place a sauce plate beneath the grill pork to collect the dripped gravy. 把炉火预热到摄氏245度,猪肉烤半个钟头后,反过来继续烤15分钟左右即可。在下方放一个盘子以收集烤肉汁。

5. To make the sauce, just add all ingredient C) together and blend till fine. Good to keep for a month as the added chili sauce contains preservative. 把辣椒酱料C)混在一起用果汁机打碎即可,可以收藏一个月左右(记得要收在冰箱!)

6. Once the meat is ready, removed from oven immediately and let it cold.
叉烧肉烤好后离开熄火,取出,要吃的时候后才切片。

7. For the Char Siew sauce, drip away all the oil and add hot water to mix to remaining of the meat gravy. Keep aside to use as meat gravy. 
把收集的肉汁加入一点烧水,混合后即可当酱汁淋在叉烧或饭上。

Char Siew is best serve with a plate of steaming white rice, simply satisfying! 

香喷喷的叉烧送 热腾腾的白饭,人生一大乐!


Sunday, May 10, 2015

Roasted Veggie & Chicken on Sticks


It's Mother's Day! 

Since we had celebrated last night with a big lobster feast, I thought we may stay home for a simple lunch today. I found some organic purple carrots and sweet potatoes given by my sister in law few days back, so I thought they will be perfect for making roasted veggie with balsamic vinegars. Added with some herbs grilled chicken, we could make some really yummy satay sticks.

So I did, and the entire family loved it!


I love mine with lots of lime and firely chili sauce from oz.

Preparation time: 20 minutes
Cooking time: 30 minutes

Ingredients:
• 600gm chicken fillet, cut into cubes
• 2 fresh limes
• 1 purple carrots, cut into big chunks
• 1 carrots, cut into big chunks
• 2 sweet potatoes, cut into big chunks
• 1 Japanese cucumber, cut into big chunks
• 1 yellow onion, cut into wedges
• 1 orange bell pepper, cut into long strips
• 12-18 cherry tomatoes (i used half for roasting and the remaining served fresh)
• some fresh basil leaves

* you may replace the purple carrots with potatoes.

Marinate for the Chicken:
• a dash of pepper
• 1.5 teaspoon of salt 
• 1 table spoon of shaoxin wine
• a dash of paprika powder
• a dash of garlic powder
• a dash of dried basil & fresh basil leaves (chopped)
• 1 tablespoon of olive oil

Seasoning for Vegetables:
• 1 tablespoon of balsamic vinegar
• 1 tablespoon of olive oil
• a dash of pepper
• a dash of salt
• a dash of black pepper
• a dash of garlic powder
• a dash of dried basil & fresh basil leaves (chopped)

* adjust all seasoning according to your preference, I did not really measure them, just drop about 4-6 dabs per seasoning.


The Making:
1. Wash and marinate the chicken cutlets at least 1 hour before cooking. Make sure you rub the salt and pepper evenly.


2. Preheat the oven at 220°c, then start preparing yor vegetables.

3. Cover the baking tray with a layer of alumnion foil (this is for easier washing later so you don't have a sticky tray!), toss the veggie into the tray and add all the seasoning. Mix them with your hands to make sure all seasoning are evenly coated.

Love the beautiful color combination...

4. Cover a layer of alumnion foil over the grill bars, poke some holes using fork and place the chicken cutlets on top (refer to pic below). 


5. Put the tray in middle section of the oven and roast for 20 minutes. On the 20th minutes, remove them from oven and turn the veggies & chicken over to the other side. You may brush some honey over the chicken for a sweet and richer taste now or just leave them as-is. Continue roasting for another 10 minutes. 

6. Once done, let the roasties cold down before arranging them onto the sticks.


7. To serve, squeez some lime juice over the sticks and serve with your favorite hot or sweet sauce... Enjoy!


Lastly, happy Mother's Day to all the great moms out there.. ❤️