Sunday, October 26, 2014

{Birthday Special} Sweetheart Cuppies of my Sweetheatt


Finally, I attempted cupcake deco with buttercream after many moons. I have never liked buttercream as I find it too sweet and too rich, bad for my weight control and also against my wish to allow the Little Ones to have so much sugar intake. However, since they are both above 2yo now I am ready to get loosen up.

As my little bunny's birthday is coming up soon, and I have already got her birthday dress ready, I decided to try out some cupcake decorating today, with homemade buttercream. Ah,  they turned out beautiful, don't they? :)

Cuppies design by PH @ food4littleones

My little handsome were so excited when the cuppies were done, kept asking if he can bring them to the school tomorrow, "they are so cute, Mommy, how did you learn to make all these?". Awww.. worth the effort to just hear him saying these. Yes, I'm a shallow mom. ;-)


Love this Ballerina Cuppie using Eccentric pink coloring, I am going to make a few of them in different shade of pinks. They are easier than it seems when crafted with fondant. I used letter "V" for the bodice and cut out a circle using the kid's cup, then created some ripples with the help of a toothpick. Join both piece with some sugar water and ta-da, the ballerina cuppie is ready!

Ballerina Cuppie

The Heart of the Ocean, another of my favorite. The contrast of the color turned out exactly as I expected. I used Navy Blue color for the ocean effect and Drop Flower tip.
Heart of the Ocean Cuppie

The Sweetheart Cuppies Trio for my little girl.. My duo absolutely love the sprinkles and little hearts. In fact 2 of these were gone right after my photo-shoot. I had to constantly keep an eye on my little girl as she had been eyeing on the ballerina cuppie the whole time! 
Sweetheart Cuppies Trio, in Eccentric Pink

The Little Fish & Little Star Cuppies, easy peasy deco using fondant but huge on cuteness effect. I'm not quite satisfied with the yellow color, so will have to fine-tune these later. All these are fondant cut out using cookie cutters.


Little Fish & Star Cuppies

Lovely cuppies, which are your favourites?


I have yet to finalise which designs to used for my little C's birthday party, but the ballerina is definite in my pick! ❤️

Almost forgotten. For anyone interested to try out some homemade buttercream, here's the simple recipe I used  from "Fabulous Party Cakes and Cupcakes", I got this book from Times book store quite some times back. I have reduced the amount of sugar used by 50% and it turned out just nice.


Simple Buttercream Recipe

• 250g unsalted butter (room temperature)
• 250g icing sugar (original recipe used 500g)
• 1 teaspoon vanilla extract
• 1 tablespoon hot water 

To make, just soften the butter in the mixer on medium speed for about 3 minute - until it is soft and creamy, then add the rest of the ingredients and mix on high speed to 5-10min until the texture turns pale white and really smooth. Your buttercream is ready!

This is enough to decorate the 12 -14 medium size cupcakes depending on your design. In my case, I still have some left over after decorating the 16 cuppies.

If there is any leftover, just store them in airtight container or cover with cling foam and place in fridge (good to keep up to a week) or freezer compartment (up to a month)


Happy cake decorating!  ❤️


Sunday, October 12, 2014

Easy Homemade Meatball Spaghetti


My little ones are both meat lovers, although they like veggies in general but meat dishes are always better received. Onion is a big no-no for them, both will diligently picked up any onion sliced in their dish. So I thought to add some diced onions into the meatballs without them noticing.

My trick worked, my little E loved the meatball spaghetti so much that he kept telling the daddy "I like this, it's delicious!" and he actually finished everything on his plate, including 7 meatballs that he made. He had been a great little helper in the kitchen since he turned 5yo and his involvement in the process had helped him to appreciate the food a lot better. 

I cooked up this dish without any reference, as I wanted to cook a stewed version instead of the conventional tomato sauce meatballs. These meatballs are crunchy on the outside but soft on the inside, even big guy approved of them. :)
  
Here's the meatball loaded serving for him. 


Mini meatballs for my little ones.


For mine, is quite a big portion too. I must confess that I'm quite a big eater. :p
(Everyone has equal portion of the green Romanies)

My little helper busy rolling meatballs and coating them with flour. Wearing the pajamas and apron made by mommy :)


So, are you ready to make some? Here's the recipe. It may look complicated due to the many herbs and spices used, but the making is really pretty simple.


Preparation Time: 20 minutes
Cooking Time: 15 minutes
Serving for: 20-30 medium meatballs  
What you need:

The Ingredients:

For Meatballs
• 300gm of minced beef (lean meat)
• 1 small carrot, diced 
• 1/4 yellow onion, diced
• 2 clove garlic, diced 
• 2 tablespoon cheddar cheese, cut cubes
• 2 tablespoon bread crumbs 
• a dash of salt
• a dash of pepper
• a dash of rosemary
• a dash of black pepper or paprika powder
• 1 tablespoon light soy sauce
• 4 tablespoon all purpose flour

For Sauce
• 1 tablespoon light soy sauce
• 1 teaspoon dark soy sauce
• 1 tablespoon Worcestershire sauce
• 1 teaspoon brown sugar
• 2 tablespoon white wine (optional for little ones)
• 1 cub water or stock

The Making:


1. Place all the ingredients for meatball (except the flour) in a big bowl and mix well using a pair of chopsticks or a fork.

2. Roll the beef mixture into balls of your preferred size - we had some mini ones for the kids and medium size for the adults. 

3. Pour the flour in a clean plate, coat a layer of flour over the meatballs by rolling it over the flour. 

4. Heat up 3 table spoons or olive oil in a skillet, cook the meat ball for about 2 minutes on each side or until they turn brown. Set aside.


5. To prepare the sauce, just mix all the sauce ingredients together in a pan (sugar shall be the last), bring it to boil and toss in the cooked meatballs. Let them simmer on low heat for about 10 minutes or until the sauce thickened. 

Tips: When cooking for little ones, you may scope out the sauce and meatball before adding the wine.

6. While the saucing is cooking, prepare the spaghetti according to the instruction on the box. Should take only about 10 minutes. (I used the leftover stir fried spaghetti)
7. Pour the sauce over the spaghetti that you have prepared and serve immediately.

Bon appetite!


Saturday, September 20, 2014

Easy Danish Butter Cookies 简易丹麦牛油饼干


I was a fan of Kjelsens Danish Butter Cookies when I was little, the round blue tin was my childhood luxury. My little ones too love these little cookies, it's buttery soft and have a crunchy texture that is hard to resist. I made these for my old ma yesterday and now it seems this shall be a regular in our kitchen as the duo couldn't stop asking for more.


Well, I know my cookies don't look like  the usual Danish cookies which is like a beautiful wreath; I had an equipment failure with my piping tool so I had to resort to alternative method. While it looks different, it tastes good, really, it literally melts in your mouth.


Noticed that 1 odd shape wreath cookie on the right row? Time to get a new piping set, urgh..

I made some baby head shape ones and popped in some chocolate chips, just for fun.


Tea time
  
I followed the simple Danish Cookies tutorial video shared by Alan. It's really fail-proof, so give it a try!


Preparation Time: 15 minutes 
Baking Time: 7-8 minutes
Serving for: approx. 80 cookies


Ingredients:
1 large egg
200g unsalted butter, room temperature
100g icing sugar (original recipe uses 130g)
320g plain flour, sifted
2 tbsp of vanilla paste or extract

The Making:

1. Preheat oven to 200°c. Place a piece of non-stick baking parchment over the baking tray.

2. Beat the eggs lightly, cut the soften butter into cubes then add all ingredient  in a mixing bowl, mix evenly using a paddle attachment on the lowest speed.


3. Pipe batter onto baking tray using an open star tip to form a wreath. (I rolled mine into ball shape and flattened with a fork.)

4. Bake for 7-8 minutes until the cookies turn golden brown. Watch it closely to avoid the cookies from being burn.

5. Leave the cookies to cool to room temperature for about 10 minutes before transferring them into an airtight container

I popped a few of these little goodies into my mouth before storing them into the jar, the best moment for a baker is to get the first bite!  ;)


Sunday, September 14, 2014

Sweet & Sour Honey Lemon Nuggets 酸甜蜜糖柠檬鸡块


I made the honey sesame chicken cutlets for my family some time back and my little ones really liked them, since I have bought some fresh chicken fillets today I though to make them their favorite dish again, but this time in 2 different flavors -  aromatic honey sesame and sweet & sour honey lemon. Both of them were so indulged with the special treats today that they actually ate 10 pieces of it Andy my little captain asked for more to bring to school tomorrow. :)


The making is really simple. You may refer to the original recipe below, just separate the chicken nuggets into half, each to be coated with different sauce and you can enjoy right away.

Original recipe for Honey Sesame Chicken Cutlets:  


Sweet & Sour Honey Lemon Sauce / 香柠酱


For sauce / 酱汁
2 tablespoons raw honey (adjust accordingly) 两大匙野生蜜糖 (自己加调)
1/2 Lemon, juiced 柠檬半粒,榨汁
1 teaspoon brown sugar 一茶匙黄糖
5 tablespoon water 五汤匙清水
 
The Making / 做法:

Mix the ingredient above in a bowl then heat up on the pan. When the sauce is starting to boil, add the cooked chicken nuggets and stir fry for about a minute until completely coated with the lemon sauce. 

用小碗把酱料调均,倒入热锅中烧滚,加入鸡肉块,快炒1分钟左右至酱汁完全被吸收,即可熄火。

Enjoy! 
开餐咯!


Sunday, August 31, 2014

Homemade Jelly Mooncake, Healthier alternative this Mid Autume 手工月饼 果冻,迎中秋!


It's Mid Autume festival again, and this time we are having a family reunion back in my hometown. As the kids and I love cold jelly and they really liked the B&W soy pudding I made last weekend, I thought I could just make some jelly mooncakes using the same method.

I was right, it's a success. The traditional mould I used scored bonus points too :)

Look at the beautiful Jade Mooncakes, made of soy milk and pandan extracts. 

又是中秋佳节,今年家乡搞个大聚会来庆团圆,我就花点心思做了几客不同口味的冷冻月饼回乡聚会去。这批手工月饼果冻的卖相不错,翡翠冻月饼的口碑最佳,但奇异果和橙汁口味嫌略淡,看来还是得糖多加。


Kiwi Jelly Mooncake with pretty fish shape. 奇异果月饼冻,微酸但卖相极佳。

Ready for delivery. 

Orange and Blackcurrent Jelly mooncake. 橙汁黑加仑紫味,养颜。


The making in 6 simple steps:


Preparation Time: 5 min
Cooking Time: 20 min
Serving for: 4 standard mooncake / 8 mini mooncakes 

Ingredients:
25gm instant jelly powder 啫喱粉 25克
500ml sweetened soy milk 黄糖豆浆500ml
1 packet honey cincao / black jelly 蜜糖凉粉一包
6 pandan leaves 香兰叶六瓣
1 mooncake mould (from bakery store) 四合一传统月饼模一个


The various mould I used, bought from a local bakery store.


For Variation:

• Orange Flavor - replace the soy milk with equal amount of fresh orange juice. You may want to add some sugar (50-100gm) if you prefer it sweeter.
橙汁味 - 用同等的分量橙汁代替豆浆,可另外加糖。

• Kiwi Flavor - replace the soy milk with equal amount of fresh kiwi juice. You may want to add some sugar (50-100gm) as this is sourish. 
奇异果味 - 用同等的分量奇异果汁代替豆浆,嗜甜的话可另外加糖。


The Making:
1. Cut the pandan leaves. Add a teaspoon of water and extract the juice using mortar and pestle or juice extractor. You should need about 3-4 teaspoons of pandan juice. 
香兰叶切幼,加入一小匙的水,用碓臼捣烂取香兰汁备用。

2. Cut the cincao into cube of 2"x2" each, or 2"x1" if you are using smaller mould, set aside. 
把凉粉切成2”x2”或 2"x1" 形状,质一旁待用。

3. Mix soy milk and instant jelly powder in a pot, bring to boil while stirring slowly. Add the pandan extract. 
把豆浆和啫喱粉混合,在一个锅里慢火煮滚,不断搅拌以免凝固。倒入香兰汁混合。

4. Pour the jelly mixture into the mould till about 2cm height, put the mixture into the fridge for about 5 minutes till hardened slightly. 
把啫喱液倒入月饼模直约莫2cm深,放入雪柜冷却大约五分钟。

5. Make a few small cuts on the jelly then place the cincao cube in the middle of the mould atop the hardened jelly; pour the remaining jelly mixture till full. If there's any air bubbles in the surface, remove it with a spoon. 
用小刀在已凝固的啫喱上切几个小切口,植入切好的凉粉,再倒入剩余的啫喱液至满。表面有小气泡的话,用汤匙抹去以免凝固后破坏美观。

6. Let it in the fridge for at least another 30 minutes till fully firm before removing the jelly mooncakes from the mould. 
让月饼冻在雪柜里冷冻至少半小时,即可取出食用。可冷藏三天。

Serve chill, the mooncake is good for about 3 days.


Useful Tips 温馨叮咛:

• if you want the mooncake to have brighter green, add a drop of green food coloring into the jelly mixture. 如果要达到更艳丽的翡翠效果,可在啫喱液里加入一、两滴的绿色素。

• for larger batch, just increase the volume accordingly. However you may want to check the instruction on the jelly powder you used as the water consistency may differ. 欲制作双倍的月饼冻的话,材料依法加倍几客。

• if you are using unsweetened soy milk, add 100-200gm of sugar for better taste. 如果你采用无糖豆浆要添加100-200克的黄糖。

• making small cuts on the base jelly will help the both layers to stick together. You can make more layers as wish using same method. 在凝固的啫喱表面划小口有助上下层衔接,你可以用这个方法制造层叠效果。


Sunday, August 24, 2014

B&W Soya Pudding, the Perfect Match 黑白布丁,绝配!


Bi-lingual | 双语版

If you are a local KL folk like me, you would probably  know what is a B&W drink, which is basically soy milk mixed with cincao, a type of black jelly. Most coffee shops, aka kopitiam, would serve this drink on their menu. It is one of my little E's favourite drinks, influenced by his daddy.


Since the weather has been so hot lately and little ones had been behaving well, I though of rewarding them with something they like, so many a cold soy milk cincao pudding seems a perfect choice for a weekend treat. Since I have some really cute moulds, they are put to good use. Aren't they looking really cute?


It's so easy, you can even make it everyday.


炎热的午后,何不来一客冰凉的布丁消暑?我家小哥哥最爱黑白饮料 -- 豆奶凉粉,所以我灵机一动把他爱的饮料和布丁结合,成了今天这个黑白布丁,绝配也..


Preparation Time: 5 min
Cooking Time: 5 min
Serving for: 8 small bowls / 2 ice cube trays

Ingredients:
• 1 
packet / 10gm of jelly powder 啫喱粉一包

• Half packet of cincao / black jelly  凉粉半包
• 750ml of soy milk  豆浆750ml
• 250ml of water  水250ml
• 100gm-200gm sugar (adjust according to your liking)  糖一百克 (随意)


The Making:


1. Cut the cincao into small cubes, drop sine cubes into eaxh mould. 凉粉切片,随意放入模型内。

2. Mix the jelly powder into the water and soy milk in a clean pot, bring to boil on high heat and stir constantly. Once boiled, turn to low heat and continue stirring. 把啫喱粉混入水和豆浆,大火煮滚后转小火,期间不断搅拌以免啫喱凝固。

3. Scope some jelly mixture into the mould, let cold before put them into the fridge. Let it rest for at least 30 minutes before serving. 把啫喱液均匀倒在模型里,冷却后放入冰箱,等至少半小时后即可个享用。

Enjoy! 


Mini B&W pudding in our little Musée Hansi cups from France. :)

Sunday, August 17, 2014

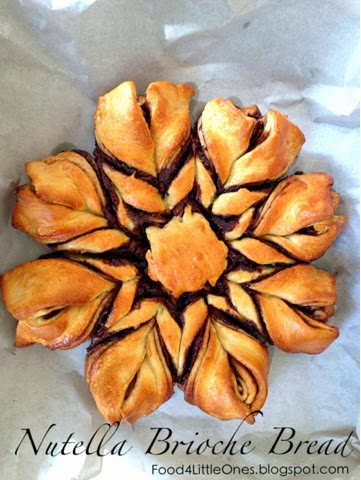
Breakaway Nutella Brioche Bread, another travel Inspired!


When we were at Strasbourg, a French medieval town, the hotel we stayed  served complimentary breakfast buffet every morning and one thing I really liked was the brioche bread. It was soft, fully and smell so good with the chocolate swirl in between.  I had not came across any brioche in most bakery that I usually patronage (maybe I did not pay attention), so I decided to give it a try at home.
When I saw this video clip by Steve's kitchen on how to make Nutella brioche bread for sharing on YouTube, I knew this is the recipe that I must try, and it didn't disappoint me. I just followed every step that Steve showed and it turned out beautifully! In fact he has many more recipes on his website that are really interesting.
My beautiful brioche


Breaking away is so easy

Last one left, and it's mine!


Making of Nutella Brioche Bread, step by step in picture

Could have almost fooled my family that I am a master in bakery, LOL, in fact I am no where near good with bread making.

I have summarized the steps based on the video, but you may also want to refer to the video for clearer understanding. It is a tedious recipe as it involved many steps and waiting time in between, but I assure you the outcome is worth it. :)

Preparation time: 55 minutes
Baking time: 15-20 minutes
Waiting time: 1h20min or more
Serving for: 8 slices

Original receipt adopted from Steve's Kitchen
Ingredients:
  • 450g of Bread Flour
  • 70g of a cup of Sugar (I substituted with brown sugar)
  • 2 Teaspoons of instant Dried Yeast
  • A pinch of Salt
  • 30g of melted Unsalted Butter
  • 180ml of warmed Milk 
  • 2 Egg Yolks, separate the whites to glaze the bread
  • 1 cup of Nutella, melted in microwave for 10 seconds (I skipped the microwave)


The Making:

1. In a clean bowl, mix bread flour, sugar, yeast and salt, mix well using a fork, then add the melted butter, milk and egg yolks. Mix the ingredients until it turns into a dough ball then move it to the table top.


2. Knit by hands for 5-10 minutes, or use the mixer. The dough shall become smooth and when you sink the finger it, it will renounce to the shape.
checking if the dough is ready 
3. Coat the dough with a light layer of olive oil, then place it into a clean bowl, cover a layer of cling foam over the bowl, follow by a damp towel. Let the dough proof for at least an hour or more until it rises to double the size. (I put mine in the microwave which was warm after I heated the butter.
4. Prepare a baking tray with a non stick baking sheet on top (or brush with some oil).
5. Cut the dough into 4 equal parts. On a clean surface, sprinkle some flour and roll the dough into a circular approximately 10" I'm diameter. Spread Nutella onto, then slip it onto the baking tray.
6. Continue the same step for next 3 dough (last dough shall not recquire Nutella spread), and stack them onto one another.
7. Place a dinner plate on top the stacked dough, use a sharp knife and cut along the plate; you shall have a nice circular dough now.
8. Place a drinking cup in the middle of the dough, use a sharp knife and cut 12 straight lines along the dough to make into equal sizes, starting from center to the edge (imagine a sunflower with 12 pedals).

9. Twist and fold 2 pedals together to form a braided pattern, continue with remaining pedals until you get a nice Sunflower shape. 

10. Preheat the oven to 180°c / 370°F.
11. Cover the dough with a clean damp cloth and let it proof for another 10 minutes. 
12. Brush the egg whites evenly onto the dough, then pop it into the oven to bake for 15-20 minutes until it turns golden brown.
It smells so so good when I took my Nutella Brioche bread out of the oven, wish I could sink my teeth into it right away. When I shared it with the family the next morning, all 8 pieces and the center piece where gone in just 5 minutes. 
This recipe is certainly a keeper for me! :)

The extra that was cut out? I made them into Nutella rolls and drip with honey when serve. Yum.. :)


Useful Tips:
• When adding the yeast into the dry ingredient, avoid touching the salt.
• Milk must be warm in order to activate the yeast. Just warm it up in microwave for about 30 seconds.
• This is an ideal choice for party, just a few of them and watch your friends break your bread apart. :)