Sunday, August 31, 2014

Homemade Jelly Mooncake, Healthier alternative this Mid Autume 手工月饼 果冻,迎中秋!


It's Mid Autume festival again, and this time we are having a family reunion back in my hometown. As the kids and I love cold jelly and they really liked the B&W soy pudding I made last weekend, I thought I could just make some jelly mooncakes using the same method.

I was right, it's a success. The traditional mould I used scored bonus points too :)

Look at the beautiful Jade Mooncakes, made of soy milk and pandan extracts. 

又是中秋佳节,今年家乡搞个大聚会来庆团圆,我就花点心思做了几客不同口味的冷冻月饼回乡聚会去。这批手工月饼果冻的卖相不错,翡翠冻月饼的口碑最佳,但奇异果和橙汁口味嫌略淡,看来还是得糖多加。


Kiwi Jelly Mooncake with pretty fish shape. 奇异果月饼冻,微酸但卖相极佳。

Ready for delivery. 

Orange and Blackcurrent Jelly mooncake. 橙汁黑加仑紫味,养颜。


The making in 6 simple steps:


Preparation Time: 5 min
Cooking Time: 20 min
Serving for: 4 standard mooncake / 8 mini mooncakes 

Ingredients:
25gm instant jelly powder 啫喱粉 25克
500ml sweetened soy milk 黄糖豆浆500ml
1 packet honey cincao / black jelly 蜜糖凉粉一包
6 pandan leaves 香兰叶六瓣
1 mooncake mould (from bakery store) 四合一传统月饼模一个


The various mould I used, bought from a local bakery store.


For Variation:

• Orange Flavor - replace the soy milk with equal amount of fresh orange juice. You may want to add some sugar (50-100gm) if you prefer it sweeter.
橙汁味 - 用同等的分量橙汁代替豆浆,可另外加糖。

• Kiwi Flavor - replace the soy milk with equal amount of fresh kiwi juice. You may want to add some sugar (50-100gm) as this is sourish. 
奇异果味 - 用同等的分量奇异果汁代替豆浆,嗜甜的话可另外加糖。


The Making:
1. Cut the pandan leaves. Add a teaspoon of water and extract the juice using mortar and pestle or juice extractor. You should need about 3-4 teaspoons of pandan juice. 
香兰叶切幼,加入一小匙的水,用碓臼捣烂取香兰汁备用。

2. Cut the cincao into cube of 2"x2" each, or 2"x1" if you are using smaller mould, set aside. 
把凉粉切成2”x2”或 2"x1" 形状,质一旁待用。

3. Mix soy milk and instant jelly powder in a pot, bring to boil while stirring slowly. Add the pandan extract. 
把豆浆和啫喱粉混合,在一个锅里慢火煮滚,不断搅拌以免凝固。倒入香兰汁混合。

4. Pour the jelly mixture into the mould till about 2cm height, put the mixture into the fridge for about 5 minutes till hardened slightly. 
把啫喱液倒入月饼模直约莫2cm深,放入雪柜冷却大约五分钟。

5. Make a few small cuts on the jelly then place the cincao cube in the middle of the mould atop the hardened jelly; pour the remaining jelly mixture till full. If there's any air bubbles in the surface, remove it with a spoon. 
用小刀在已凝固的啫喱上切几个小切口,植入切好的凉粉,再倒入剩余的啫喱液至满。表面有小气泡的话,用汤匙抹去以免凝固后破坏美观。

6. Let it in the fridge for at least another 30 minutes till fully firm before removing the jelly mooncakes from the mould. 
让月饼冻在雪柜里冷冻至少半小时,即可取出食用。可冷藏三天。

Serve chill, the mooncake is good for about 3 days.


Useful Tips 温馨叮咛:

• if you want the mooncake to have brighter green, add a drop of green food coloring into the jelly mixture. 如果要达到更艳丽的翡翠效果,可在啫喱液里加入一、两滴的绿色素。

• for larger batch, just increase the volume accordingly. However you may want to check the instruction on the jelly powder you used as the water consistency may differ. 欲制作双倍的月饼冻的话,材料依法加倍几客。

• if you are using unsweetened soy milk, add 100-200gm of sugar for better taste. 如果你采用无糖豆浆要添加100-200克的黄糖。

• making small cuts on the base jelly will help the both layers to stick together. You can make more layers as wish using same method. 在凝固的啫喱表面划小口有助上下层衔接,你可以用这个方法制造层叠效果。


Sunday, August 24, 2014

B&W Soya Pudding, the Perfect Match 黑白布丁,绝配!


Bi-lingual | 双语版

If you are a local KL folk like me, you would probably  know what is a B&W drink, which is basically soy milk mixed with cincao, a type of black jelly. Most coffee shops, aka kopitiam, would serve this drink on their menu. It is one of my little E's favourite drinks, influenced by his daddy.


Since the weather has been so hot lately and little ones had been behaving well, I though of rewarding them with something they like, so many a cold soy milk cincao pudding seems a perfect choice for a weekend treat. Since I have some really cute moulds, they are put to good use. Aren't they looking really cute?


It's so easy, you can even make it everyday.


炎热的午后,何不来一客冰凉的布丁消暑?我家小哥哥最爱黑白饮料 -- 豆奶凉粉,所以我灵机一动把他爱的饮料和布丁结合,成了今天这个黑白布丁,绝配也..


Preparation Time: 5 min
Cooking Time: 5 min
Serving for: 8 small bowls / 2 ice cube trays

Ingredients:
• 1 
packet / 10gm of jelly powder 啫喱粉一包

• Half packet of cincao / black jelly  凉粉半包
• 750ml of soy milk  豆浆750ml
• 250ml of water  水250ml
• 100gm-200gm sugar (adjust according to your liking)  糖一百克 (随意)


The Making:


1. Cut the cincao into small cubes, drop sine cubes into eaxh mould. 凉粉切片,随意放入模型内。

2. Mix the jelly powder into the water and soy milk in a clean pot, bring to boil on high heat and stir constantly. Once boiled, turn to low heat and continue stirring. 把啫喱粉混入水和豆浆,大火煮滚后转小火,期间不断搅拌以免啫喱凝固。

3. Scope some jelly mixture into the mould, let cold before put them into the fridge. Let it rest for at least 30 minutes before serving. 把啫喱液均匀倒在模型里,冷却后放入冰箱,等至少半小时后即可个享用。

Enjoy! 


Mini B&W pudding in our little Musée Hansi cups from France. :)

Sunday, August 17, 2014

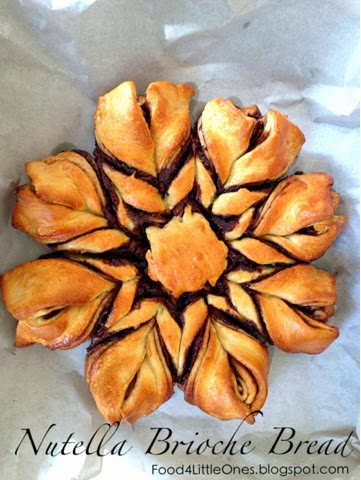
Breakaway Nutella Brioche Bread, another travel Inspired!


When we were at Strasbourg, a French medieval town, the hotel we stayed  served complimentary breakfast buffet every morning and one thing I really liked was the brioche bread. It was soft, fully and smell so good with the chocolate swirl in between.  I had not came across any brioche in most bakery that I usually patronage (maybe I did not pay attention), so I decided to give it a try at home.
When I saw this video clip by Steve's kitchen on how to make Nutella brioche bread for sharing on YouTube, I knew this is the recipe that I must try, and it didn't disappoint me. I just followed every step that Steve showed and it turned out beautifully! In fact he has many more recipes on his website that are really interesting.
My beautiful brioche


Breaking away is so easy

Last one left, and it's mine!


Making of Nutella Brioche Bread, step by step in picture

Could have almost fooled my family that I am a master in bakery, LOL, in fact I am no where near good with bread making.

I have summarized the steps based on the video, but you may also want to refer to the video for clearer understanding. It is a tedious recipe as it involved many steps and waiting time in between, but I assure you the outcome is worth it. :)

Preparation time: 55 minutes
Baking time: 15-20 minutes
Waiting time: 1h20min or more
Serving for: 8 slices

Original receipt adopted from Steve's Kitchen
Ingredients:
  • 450g of Bread Flour
  • 70g of a cup of Sugar (I substituted with brown sugar)
  • 2 Teaspoons of instant Dried Yeast
  • A pinch of Salt
  • 30g of melted Unsalted Butter
  • 180ml of warmed Milk 
  • 2 Egg Yolks, separate the whites to glaze the bread
  • 1 cup of Nutella, melted in microwave for 10 seconds (I skipped the microwave)


The Making:

1. In a clean bowl, mix bread flour, sugar, yeast and salt, mix well using a fork, then add the melted butter, milk and egg yolks. Mix the ingredients until it turns into a dough ball then move it to the table top.


2. Knit by hands for 5-10 minutes, or use the mixer. The dough shall become smooth and when you sink the finger it, it will renounce to the shape.
checking if the dough is ready 
3. Coat the dough with a light layer of olive oil, then place it into a clean bowl, cover a layer of cling foam over the bowl, follow by a damp towel. Let the dough proof for at least an hour or more until it rises to double the size. (I put mine in the microwave which was warm after I heated the butter.
4. Prepare a baking tray with a non stick baking sheet on top (or brush with some oil).
5. Cut the dough into 4 equal parts. On a clean surface, sprinkle some flour and roll the dough into a circular approximately 10" I'm diameter. Spread Nutella onto, then slip it onto the baking tray.
6. Continue the same step for next 3 dough (last dough shall not recquire Nutella spread), and stack them onto one another.
7. Place a dinner plate on top the stacked dough, use a sharp knife and cut along the plate; you shall have a nice circular dough now.
8. Place a drinking cup in the middle of the dough, use a sharp knife and cut 12 straight lines along the dough to make into equal sizes, starting from center to the edge (imagine a sunflower with 12 pedals).

9. Twist and fold 2 pedals together to form a braided pattern, continue with remaining pedals until you get a nice Sunflower shape. 

10. Preheat the oven to 180°c / 370°F.
11. Cover the dough with a clean damp cloth and let it proof for another 10 minutes. 
12. Brush the egg whites evenly onto the dough, then pop it into the oven to bake for 15-20 minutes until it turns golden brown.
It smells so so good when I took my Nutella Brioche bread out of the oven, wish I could sink my teeth into it right away. When I shared it with the family the next morning, all 8 pieces and the center piece where gone in just 5 minutes. 
This recipe is certainly a keeper for me! :)

The extra that was cut out? I made them into Nutella rolls and drip with honey when serve. Yum.. :)


Useful Tips:
• When adding the yeast into the dry ingredient, avoid touching the salt.
• Milk must be warm in order to activate the yeast. Just warm it up in microwave for about 30 seconds.
• This is an ideal choice for party, just a few of them and watch your friends break your bread apart. :)

Saturday, August 16, 2014

Potato n Mushrooms Rösti, inspired by the Swiss


During our recent family trip to Westerner Europe, Rösti is one of the common dishes we often found on the recipes of many restaurants in Germany and French towns (besides bratswurst, of course), however later only we found out that Rösti is actually consider a national dish to Switzerland. No wonder it was offered at Marche, the international chain from Switzerland.  

Anyway, when we first tried it in Colmar, the enhanting Alsace town which our Bukit Tinggi is modeled after, it was piping hot and was really mouth watering. I am not sure it's because of the hyper mode we were in, the sizzling summer or the beautiful town that inspired us, but some how the crispy bacons and mushroom slices had a special chemistry with the soft mushy texture of the grated potatoes. It is aurally a common farmer dish, using inexpensive ingredients, easy to prepare and is filling to the tummy, but tasty none the less.

The traditional Rösti is actually just a potato pancake with nothing added, what we had was very much the luxury version loaded with more ingredients and cheese, I decided to give it a try back home and it turned out alright, but I need a but more practise flipping it.

Rosti. the copy cat style

Ingredients:

  • 6 medium potatoes, washed 
  • 1/2 onion, diced
  • 100gm streak bacons, thinly sliced
  • 6 brown mushrooms, thinly sliced
  • 2 clove garlic, diced
  • 2 big spoon of shredded cheddar cheese 
  • 2 teaspoon rosemary 
  • Salt & pepper to taste 

Preparation time: 25 minutes
Cooking time: 25 minutes 
Serving for: 3-4 pax

The ingredient. I boiled too many potatoes, you really just need 6


Grating the potatoes

Methods:

1. In a pot of hot water, boil the potatoes for 5 - 7 minutes. To test if it's ready, poke the potato with a fork and it shall be still firm but can poked through with ease. Let the potatoes cool before use.

2. Stir fry the mushrooms and onions for about a minute, set aside.
3. Peel the cooled potatoes and coarsely grate them (must be cooled completely else will be difficult to peel). Mix all ingredients in a plate, including the cheese.

4. Heat up 2 table spoon of olive oil (or butter) in a 8" pan, spread the Rösti mixture evenly over the pan. Cook both side for 5 minutes or until it turns golden brown.

5. Serve!


Homemade rosti, with our beautiful Hansi glass from Colmar