Showing posts with label snack. Show all posts

Monday, September 7, 2015

Double Chocolate Cookie Balls


The kids absolutely love chocolate, and so do I. I have been buying them Chipsmore cookies occasionally but when I'm not too lazy, I will bake our favorite double chocolate cookies with reduced sugar. Today happened to be my not-so-lazy day so I started baking while listening to my all time favorite album, French Kiss. 
  

Soft on the inside, crunchy on the outside. It's what I called Love at first bite...


Preparation: 30 minutes
Baking Time: 10-12 minutes
Serving: 14-16 pieces

Original recipe adopted and modified from Food Lovers' Cooking for Children.


Ingredients:
• 100g unsalted butter, cut cubes
• 100g brown sugar 
• 3 tablespoon unsweetened cocoa powder (I used Hershey's)
• 1 teaspoon baking powder
• 1 teaspoon vanilla extract
• 1 large egg, beaten
• 170g all purpose flour, sifted
• 2 palmful / half cup of dark chocolate chips (add more if you wish)
• 1 teaspoon icing sugar (for sprinkle)


The Making:

1. Preheat oven to 180°c, lay a piece of baking sheet over the tray.

2. In a dry mixer bowl, beat butter with sugar until fluffy, then gradually add in the egg, vanilla extract, the sift in the flour, baking powder and cocoa powder.

3. Mix with a spatula until well mixed, then add the chocolate chips.

4. Using your palms, shape one large scope of dough into a round ball and place the cookie dough onto the baking tray, with at least 2" apart from each other.

5. Bake for 10-12min in the middle compartment, the cookies will expand slightly when baking.

6. Once done, remove from oven and let cool for about 10 minutes. Sprinkle with some icing sugar on top and keep in an airtight container. I could never resist to eat one right away, they smell too good to resist!

Enjoy...  ;)


Monday, May 25, 2015

Rolled Eggs & Ham


This is one easy breakfast and it's even suitable for lunch box, you shall try this if your kids love cheese or ham, or both. :)


I wish I have better pictures to share, but the kids started grabbing and eating before I could snap any picture... 

 
Preparation Time: 5 minutes
Cooking Time: 8 minutes
Make 3 egg rolls of 7" long each


Ingredients:
• 100gm hams of your choice, cut to about 2mm each
• 1 slice cheddar cheese, cut into 3 strips of equal size
• 4 medium eggs, beaten
• few fresh basil leaves, chopped  
• 1 tablespoon fresh milk
• a dash of pepper


The Making:
1. Heat up pan, add a slice a bacon to lightly cook on both side for about 10 seconds then set aside. The bacon will coat the pan with oil so there is no need for additional cooking oil.

2. Add milk, basil leaves and pepper into the egg, beat to mix well and add one large scope into the hot pan. Spread out to form a perfect circle.


3. Place the bacon over the egg omelette, and a slice of cheese in the middle. Using the spatula and a spoon/chopsticks, slowly roll the omelette from one end to the other. In the half way while rolling up, I added half a scope of egg omelette to make it into an oblong shape instead of circle, this makes a bigger egg roll.

4. Cook the remaining egg omelette rolls using step 1-3 and cut into thick slices of about 1.5" each only when they have cold down (it will crack easily if cut when hot)


Serve with your favourite sauce or just eat directly, either way they are delicious.. 


Meat Free Version
Not a meat lover? Just replaced ham with carrots, potatoes and raisins, and you have one healthy vegetarian meal. You can even add a seaweed sheet. Seen here, I used purple carrots so the rolls looked kind of mouldy. LOL.


Sweat free breakfast that anyone can make.. Enjoy!

Sunday, December 14, 2014

Homemade Potato Croquettes, simply too good to resist!


Little guy and I were making potato bread earlier and we have half a bowl of mashed potatoes left, the recipe only calls for 50gm of mashed potatoes but the one large potato we boiled was nearly 140gm. 

So what to do with the leftover mashed? I decided to make some creamy & crunchy potato croquettes, and it became the most popular dish on my dinner table tonight.


Don't get fooled by its rather uninteresting appearance, it is actually better than chicken nuggets sold in the fast food store. ;) 


Preparation Time: 25 minutes
Cooking Time: 10 minutes 
Serving for: approximate 8 medium croquettes 


Ingredients:

Ingredient A
• 1/2 large potato, washed (approx 80g)
• 1 teaspoon of salt
• 1 slice cheddar cheese or approx 15g block cheddar cheese, cut into small cubes 
• 1 teaspoon of basil leaves
• 1 large egg, beaten

Ingredient B (For Coating)
• 2 tablespoon bread crumbs 
• 2 tablespoon corn flour 


The Making:
1. Boil the potato with skin in a pot of boiling water for 20 minutes. Remove from the water, let cold and peel of the skin. Cut the potato into large cubes and mash them by pressing firmly with the back of a fork. 

2. Mix the mashed potatoes with all ingredient A. Shape them into oval shape patties of your desired size (I made them about 5cm long).

3. Coat the patties evenly with corn flour follows by a generous layer of bread crumb.

4. Heat up the pan with about 4 table spoon of coking oil, cook each side of the potato croquette for about 3 minutes or until golden brown. 

5. Absorb excessive oil with a kitchen napkin, serve as-is or with  your favorite sauce.

My kiddos and Big Guy enjoyed these so much, my boy actually gave me a double thumb ups! LOL.

Useful Tips:
• I added some small potato cubes into the patty to give some twist to the otherwise soft croquettes.
• I like to make my potato croquettes thin (about 1" thickness) so it is really crunchy on the outside and creamy on the inside. Even I couldn't resist eating a few pieces of these delicious treats! 


Sunday, August 17, 2014

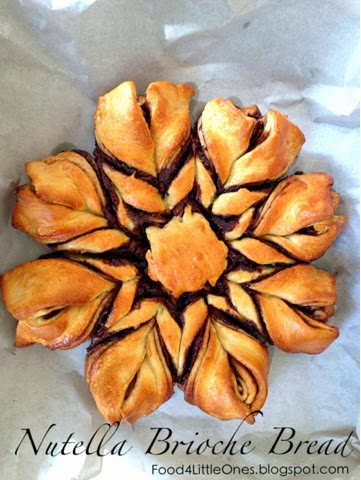
Breakaway Nutella Brioche Bread, another travel Inspired!


When we were at Strasbourg, a French medieval town, the hotel we stayed  served complimentary breakfast buffet every morning and one thing I really liked was the brioche bread. It was soft, fully and smell so good with the chocolate swirl in between.  I had not came across any brioche in most bakery that I usually patronage (maybe I did not pay attention), so I decided to give it a try at home.
When I saw this video clip by Steve's kitchen on how to make Nutella brioche bread for sharing on YouTube, I knew this is the recipe that I must try, and it didn't disappoint me. I just followed every step that Steve showed and it turned out beautifully! In fact he has many more recipes on his website that are really interesting.
My beautiful brioche


Breaking away is so easy

Last one left, and it's mine!


Making of Nutella Brioche Bread, step by step in picture

Could have almost fooled my family that I am a master in bakery, LOL, in fact I am no where near good with bread making.

I have summarized the steps based on the video, but you may also want to refer to the video for clearer understanding. It is a tedious recipe as it involved many steps and waiting time in between, but I assure you the outcome is worth it. :)

Preparation time: 55 minutes
Baking time: 15-20 minutes
Waiting time: 1h20min or more
Serving for: 8 slices

Original receipt adopted from Steve's Kitchen
Ingredients:
  • 450g of Bread Flour
  • 70g of a cup of Sugar (I substituted with brown sugar)
  • 2 Teaspoons of instant Dried Yeast
  • A pinch of Salt
  • 30g of melted Unsalted Butter
  • 180ml of warmed Milk 
  • 2 Egg Yolks, separate the whites to glaze the bread
  • 1 cup of Nutella, melted in microwave for 10 seconds (I skipped the microwave)


The Making:

1. In a clean bowl, mix bread flour, sugar, yeast and salt, mix well using a fork, then add the melted butter, milk and egg yolks. Mix the ingredients until it turns into a dough ball then move it to the table top.


2. Knit by hands for 5-10 minutes, or use the mixer. The dough shall become smooth and when you sink the finger it, it will renounce to the shape.
checking if the dough is ready 
3. Coat the dough with a light layer of olive oil, then place it into a clean bowl, cover a layer of cling foam over the bowl, follow by a damp towel. Let the dough proof for at least an hour or more until it rises to double the size. (I put mine in the microwave which was warm after I heated the butter.
4. Prepare a baking tray with a non stick baking sheet on top (or brush with some oil).
5. Cut the dough into 4 equal parts. On a clean surface, sprinkle some flour and roll the dough into a circular approximately 10" I'm diameter. Spread Nutella onto, then slip it onto the baking tray.
6. Continue the same step for next 3 dough (last dough shall not recquire Nutella spread), and stack them onto one another.
7. Place a dinner plate on top the stacked dough, use a sharp knife and cut along the plate; you shall have a nice circular dough now.
8. Place a drinking cup in the middle of the dough, use a sharp knife and cut 12 straight lines along the dough to make into equal sizes, starting from center to the edge (imagine a sunflower with 12 pedals).

9. Twist and fold 2 pedals together to form a braided pattern, continue with remaining pedals until you get a nice Sunflower shape. 

10. Preheat the oven to 180°c / 370°F.
11. Cover the dough with a clean damp cloth and let it proof for another 10 minutes. 
12. Brush the egg whites evenly onto the dough, then pop it into the oven to bake for 15-20 minutes until it turns golden brown.
It smells so so good when I took my Nutella Brioche bread out of the oven, wish I could sink my teeth into it right away. When I shared it with the family the next morning, all 8 pieces and the center piece where gone in just 5 minutes. 
This recipe is certainly a keeper for me! :)

The extra that was cut out? I made them into Nutella rolls and drip with honey when serve. Yum.. :)


Useful Tips:
• When adding the yeast into the dry ingredient, avoid touching the salt.
• Milk must be warm in order to activate the yeast. Just warm it up in microwave for about 30 seconds.
• This is an ideal choice for party, just a few of them and watch your friends break your bread apart. :)

Friday, May 30, 2014

Spicy Teriyaki Sausages #15MinuteSuppers

Last weekend I decided to clear all the frozen meats I have in the freezer, and I found some sausages, a slice of cod fish, half an onion and some broccoli in the chiller compartment. Suddenly I thought of the spicy grilled sausage tapas we had in La Bodega restaurant and how we loved it with a jug of chilled Sangria.

Another 15 Minute Supper idea. *light bulb beaming*

So I made this Spicy Teriyaki Sausages, perfect to serve as appetizer or as a side dish. 


I wish I had better picture to share, but my 2 boys just could not wait and half the plate was gone when I took this picture (one of which is my Big Guy)... I didn't expect my little boy to like this dish as it is slightly spicy. He ate quite a few slices and kept asking for more. 

Best of all, took me only 10 minutes to have it served.


Preparation Time: 5 min
Cooking Time: 5 min
Serving for: 2-4 person

Ingredients:

2 foot-long gourmet sausages, roughly sliced 
1/2 onion, cut into wedges
1 tablespoon of olive oil

Seasoning:
teaspoon sesame oil
1 tablespoon Teriyaki sauce 
A dash of paprika powder (or more if you like it fiery)
A dash of pepper


The Making:

1. Heat up the pan with a tablespoon of olive oil, toss in the onion and stir fry for a minute till it turns transparent.

2. Toss in the sliced sausages follow by all the seasoning, stir to mix well and let it cook for about 3 more minutes for the sausages to cook thoroughly. Serve hot.

It is that simple.. we had a filling lunch that afternoon and a very clean fridge!


Interested with the steam cod fish? Another 10 minutes dish. ;) Grab the simple recipe here..


Need more quick 15 minute recipe ideas? Check out these other great #15MinuteSuppers!
Follow 15 Minute Suppers on Facebook | Twitter | Instagram | Pinterest
and look for the #15MinuteSuppers hashtag too!
15 Minute Suppers
BLOGGERS: Would you like to join us at #15MinuteSuppers? We’d love to have you! Please check out the 15 Minute Suppers website or ask to join the Facebook group (for bloggers) to participate on Fridays…we’d love to have you join us.

Sunday, May 11, 2014

Kids 'n Mommy Favorite: Chocolate 'n Coffee Waffles!


My kiddos love love love waffles, so do I. Whether to serve with honey, banana and ice cream, chocolate, blueberry jam or maple syrup, we never fail to finish it off, only problem is outside restaurants never sell cheap. So I decided to make the duo their favorite for breakfast at home.

This is what we had today. Light and fluffy, perfect chocolate & coffee waffles for Sunday breakfast.. I kept the remaining batter in the fridge so we can have waffle again the next weekend. :)

Chocolate & Coffee Waffle with yogurt. For daddy & mommy.


Chocolate Waffle with wild honey. For the kiddos.

Freshly made hot waffles, smelling nice..

My duo loving their breakie. So do we. 


I'm loving this and I don't mind making them again and again. The good thing of homemade waffle is that I can control the sweetness and my choice of ingredients. 


Preparation: 10 minutes
Cooking: 10 minutes
Serving for: 10-12 medium waffles


Ingredients:

Ingredient A
2 egg whites
1/2 table spoon brown sugar 

Ingredient B
2 egg yolks 
2 cups all purpose flour / wholemeal flour
1 3/4 cups fresh milk
1/2 cup vegetable oil 
1/2 teaspoon cinnamon powder (optional if without)
4 teaspoons baking powder
1/4 teaspoon salt
1/2 teaspoon vanilla extract 
1/2 table spoon of unsweetened cocoa powder
1 table spoon of chocolate chips 

Not A Chocolate Lover? 
Easy, just minus the cocoa powder.

Any Coffee Lover like Me?
Just add 1/2 tea spoon of instant coffee powder into the mixture, mix well.


The Making:

1. In a clean bowl, mix the flour, salt, baking powder and cinnamon powder. Add the egg yolk, milk, vegetable oil and vanilla extract, continue mixing until it reaches a smooth texture. I added some Choco chips for the kids version, secret treats for them.

2. In a separate mixer bowl, whisk  ingredient A on high speed until it reaches peak. If you are using manual mixer, do be warn that this will be quite an upper arm exercise... On the other hand, do not over whisk as it may collapses and turns watery. Once you see it's stiff and peak, just stop.

3. Fold the egg white into ingredient A, mix evenly in slow motion. Doesn't it looks like a clump of cloud? 


4. Heat up the waffle machine, scoop about 3-4 spoons of the mixture onto the waffle plate and cook until golden brown (took about 4-5 minutes or as per indicated by your machine). I like mine in crispy golden brown so I gave an extra 30 seconds, they are oh-so crunchy..

  
Now you may add your favorite topping and serve while it's hot, I mean like immediately from the waffle maker if you can.

Instead of whipped cream or ice cream, I served mine with yogurt instead. Great companion & an ideal low fat option :) 

Enjoy the fluffiness in every bite!


Tips...
Only have 10 minutes to spare? No problem, you can choose not to separate the eggs, just add ingredient A and B together and mix well, your waffle batter will be ready in no time! However, do note that the waffle may not be as fluffy and crunchy if using short cut way...

Wednesday, February 5, 2014

Crispy Pumpkin Seeds & Almond Flakes Cookies {CNY Special!} 南瓜花籽杏仁脆脆饼

It's CNY! Time to have some healthy snack that is not so high in sugar so can munch on without much guilt. 

I had been really busy spring cleaning, sewing after work and on weekend that I can hardly find time to bake any CNY cookies apart from the almond biscottis which almost finished up by now, I decided to do last minute baking on the CNY eve, just stole 30 minutes from the spring cleaning and finished up this last minute baking.


This is a super simple yet addictive snack you won't want to miss, besides, I can guarantee any kiddos would love this snack. :)

I made 2 flavored - Crispy Pumpkin Seed Cookies and Crispy Almond Flakes Cookies, either one they tasted great!


On the next weekend, I spared 20+ minutes and made these yummies again, this time using Lotus seeds, left over from my snow skin mooncakes.


This glass jar I bought from IKEA is perfect to keep them air tight. Anyway the cookies were all grabbed up by that very evening they were baked. :)


Preparation time: 10 min 
Baking Time: 10-12min
Serving for: 1 baking tray (about 30 6cm x 3cm size cookies)

预备时间:10分钟
烘烤时间: 10-12分钟

Ingredients:
2 Large Egg White / 3 Mediun Egg White 两粒蛋白(大型) / 三粒(中型)
50gm all-purpose flour 50克普通面粉
60g castor sugar 60克白糖
30g butter, melted 30克融化牛油
80g Pumpkin seed / Sunflower Seed / Almond Flakes  80克南瓜种籽/太阳花籽/杏仁片

This is exactly enough for 1 baking tray, if you want to yield more just double the ingredient accordingly.


The Making:


1. Preheat oven to 170°c / 350°F, place a non stick baking sheet over the baking tray. Brush a thin layer of melted butter onto the baking sheet.


2. Whisk egg white in a mixer on high speed until stiff (or really fast if on hand mixer). Add sugar and continue whisking it till well mix .

3. Sieve the flour and butter into the egg mixture, fold in the flour slowly using a spatula (do not over mix)

4. Drop in the pumpkin seeds / almond flakes, mix roughly.

5. Scope the mixture onto the baking tray and spread it as thin as possible using a spatula, drop more seeds if you wish to ensure generous coverage. Bake for 10-12 minutes until it turns golden brown. The longer you bake the crispier it becomes.

6. Remove from oven and let cool on a wiring rack. Tear the baking sheet, break up the cookies carefully and you're done!

Now, keep them in airtight jar before your kids can get their hands onto the cookies, quick!


The ready cookie sheet, i felt like sinking my teeth right into it..

Look how thin it is. The thinner the better (I mean, for this cookie ;)


Useful Tips!
To ensure you can remove the baking sheet easily, spread a thin layer of melted butter or cooking oil over the sheet before pouring the mixture, you can tear off the baking sheet easily.


Alright, it's time to wash up and get ready for the reunion dinner now.. 

I would like to take this chance to wish you and your family a very Happy Chinese New Year & may you be showered wig abundance of good luck and joy!

稍后我会上载中文版食谱,赶着回去团圆饭了。祝各位读者们新年快乐,事事顺意,马年进步!

Sunday, December 22, 2013

Happy Meal {Christmas Edition} Snowman is Here!

We are all in the mood of Christmas, so while having fruits after dinner, I cut the apples into round slices so I can arrange them into these cute little snowmen (just cut apple into half and scope out the core with a spoon. No special tools required).

Little Snowmen playing under the starlight and snowflakes..


Says who that preparing Christmas food is time consuming? This took me only 5 minutes and my duo had fun munching away their apple snowmen. :)


Friday, November 22, 2013

Monster Eyes Cookies 可爱单眼小饼干

My little ones are big fans of chocolate cookies, they chomped down quite some chunky Cookie Time cookies when we were traveling in NZ.

Since baking cookies only takes approximate 30 minutes (plus additional 15min for cleaning up), I don't mind to bake them cookies frequently;  no preservative and low sugar content, so better than store bought all the time. I bought a fabulous bilingual recipe book from the recent Popular book fair, The Secret of Cookies, 告诉你,饼干の秘密, it's a real keeper.

Modified based on one of the recipes, I made these Monster Eyes cookies. Perfect for snack time with my duo, or even for party. The little friends can have some good fun playing with these  monster eyes. @•@

The monstrous eyes and some snow ball cookies (soft some icing sugar once cookies are cool)


All packed and waiting to be eaten :)


These are the first version I made, simple button cookies, rolled into small balls then pressed using the back of a fork. Pretty and tasty none the less.


Preparation Time: 30 min
Cooking Time: 15 min
Serving for: 30 pieces (size of an old 50 cents coin)

Ingredients:

Ingredient A:
95g unsalted butter, cut into cubes at room temperature  
35g fine confectionary sugar

Ingredient B:
110g cake flour (or super fine flour)
15g cocoa powder
2 tablespoon of almond nibs

Decoration:
30 chocolate chips


The Making:
1. In a medium bowl, mix the butter with sugar, beat until the mixture becomes creamy. I usually do manual mixing for cookies since there is no need for vigorous beating.

2. Sift the cake flour into ingredient A and mix well until it forms a course dough.

3. Separate the dough into half, and add  cocoa powder into the second bowl and continue to mix using a spatula until color are well blended.

4. Using a rolling pin, roll the cocoa dough into long rectangular shape. Place the dough onto a cling form over the kitchen worktop.

5. Using your hands, roll the other dough into long cylinder, and place it in the middle of the cocoa dough, wrap the cocoa dough around it to form a Swiss roll shape.

6. Wrap the cling form around the dough, let it chill in the freezer for about 15 minutes. This will allow the dough to firm up hence easier for cutting / shaping.

7. Preheat the oven to 180°c, lay a non stick parchment over the baking tray. 

8. Cut the dough into individual slices approximate 1" thick, then press 1 Choco chip into the center of each slice, this will be the pupil. Lay them flat on the baking tray with about 2cm apart, the cookies will expand lightly when baking.

9. Bake the dough for 15-18 minutes. The cookies may be slight soft when done, but once cool, they will be hard and crunchy.

Now you may admire, play and eat your monster eyes! Keep them in an air tight jar and they shall last for a week (mine had never last more than 3 days..)


Tips!
• I hate cookie crumbs on my sofa, so I made them into bite size to avoid having crumbs all over the house. You may devied the size but do keep the thickness (or you will have to adjust the baking time).

Monday, November 18, 2013

Happy Meal: 5 Little Ducks


Want to make a breakfast that will brighten up the day? Why not try some simple food art, all you need is some ready ingredients and 5 minutes of cutting and arranging, and put your own creativity to test. 

I got my inspiration as I was cutting the banana for my little girl, and few minutes later, Ta-Da... We've got school of happy ducklings swimming under the bright blue skies, conttony clouds & a river full of fallen stars


"5 little ducks went out one day, over the hill and far away...". 
My duo were happily singing along when the breakfast was served.

Check out more homemade happy meals here, hope these bring your little ones many happy mornings. :)