Showing posts with label breakfast. Show all posts

Tuesday, May 12, 2020

{Breadmaker Recipe} Pumpkin Seed Honey Loaf


Weekend approaching, why not have some healthy breakfast?

Pumpkin seeds with honey bread loaf is one easy bake with the help of breadmaker this is super easy. You may replace the pumpkin seeds with any other nuts or seeds of your choice, maple nuts or sunflower seeds would be a good option too.


Preparation Time: 10 Minutes
Baking Time: 4 Hours
Serving size: 500gm loaf / 6-8 slices


Ingredients:

• 250g organic High Gluten flour
• 15g unsalted butter
• 2 tbsp brown sugar
• 1 tbsp milk powder
• 1 teaspoon salt
• 1 tbsp raw honey diluted in 180ml water at 5c°
• 1 teaspoon instant dry yeast
• 20g organic pumpkin seed 


The Making:

1. Mix all ingredient (except yeast and pumpkin seed) in the bread container as per display order, pour the honey water around the perimeter of the pan. Add yeast in the yeast dispenser and sunflower seed in the nut compartment.

2. Select "soft bread" function (or of equivalent on your machine, I used a Panasonic) and start. It shall takes 4 hours 20 min. 

That's it. I set mine to timer mode and enjoy a fresh loaf the next morning :) 

Love freshly baked bread too? Get your own Panasonic Breadmaker here...


Wednesday, September 16, 2015

Best Homemade Waffle Combo!


Waffles seem to be the latest attraction in town, there is this Owl Cafe, Madame Waffle, Kaffeine cafe all well known for their sweet and savoury waffles. I have managed to try out 2 of these waffle shops and decided to give it a try at home. 

1 batter. 3 different flavors. 1 big breakfast. 2 superbly happy kiddos.

This is my Green Tea, Cocoa & Tuna Waffles Combo, with a drop of vanilla ice cream. 

Ahhhh.... Life is good.

Best companion: Tuna waffles with mayonnaise, Cocoa waffles with cocoa syrup, Green tea waffle with almond flakes and fruits & nuts.  


Tuna Waffles

Green Tea Waffles

Chocolate Waffle with Vanilla Ice cream

I thought I made too many waffles (total 12 pieces) but we managed to finish all! The tuna waffle is voted the best by Big Guy and my little boy. Perhaps next time I shall try some bacon bits.. :)

Just use the batter recipe I shared last year here, and mix in different bowls. 

• Green tea: mix 7gm or 2 teaspoons green tea with 6 tablespoons of batter.

• Tuna: mix 4-5 tablespoon of tuna flakes in water with 6 tablespoons of batter.

• Cocoa waffle: mix 2 tablespoon of unsweetened cocoa powder with 6 tablespoons of batter.

I love homemade breakie as we can add any condiments as we like. Almond flakes, sunflower seeds, cocoa syrups, raisins, dried cranberries, berries, blueberry jam, apricot jam... The combination is simply endless!

Hope you enjoy this as much as we do. Ciao!

Saturday, July 25, 2015

{Breadmaker Recipe} Bread Making Day (simple bread dough)


We had a long weekend break thanks to the Hari Raya holiday, so I invited my sisters to come over and have a bake-off day. My eldest sister is really good at bread making!

After a busy morning, these are some of our beautiful baked goods.. Almond breaded buns, cheddar cheese buns and blueberry bins.


Raisins, Nutella and peanut butter buns too..

I made the dough a night earlier and left it to slow-rise in the fridge compartment overnight, covered with a cling form. Look how big it became the next morning? Perfect for baking. 


Simple round shape dough, endless molding possibily. The muffin pan is perfect to keep the round shape, just make sure you lightly oil each cupcake holder to avoid sticking.


Preparation Time: 30 Minutes
Baking Time: 10 - 15 min
Serving size: 10 - 14 buns

Ingredients:

• 280g high gluten flour 
• 50g unsalted butter
• 2 tbsp / 12g milk powder
• 3 tbsp / 36g granulated or brown sugar
• 1 teaspoon / 5g salt 
• Half of a medium egg (25g)
• 160ml water at 5c°(I just added some ice cubes) 
• 1teaspoon / 2.8g instant dry yeast

For Filling:
• Blueberry sauce (from bakery supplies store)
• Chicken floss
• Peanut butter jam
• Nuttela

For Toppings:
• 1 egg yolk for brushing 
• some almond flakes 
• shredded cheddar cheese / powder


The Method:
1. add all ingredient into bread pan, except yeast in the yeast dispenser.

2. Select menu "9" (for Panasonic BM) or Bread dough recipe on your bread maker. Press "start".

3. When the dough is ready and you should heard the beep beep sound (44  minutes later), you can either:
• leave the dough in the pan, cover in a cling form and leave it to rise overnight in the fridge (NOT freezer!)
• cover the pan with a clean tower and let the dough rise for 45 minutes until it rises fully.

4. Knead the dough with a rolling pin to remove bubbles (air) from the dough, then shape the bread according to your prefered shapes. Place them in a tray (sprinkle with flour or oil at bottom to avoid sticking) and cover with a clean towel / cling form, let them rest for about 1h (the dough shall grow double in size). 

5. Brush egg yolk over the top of the bread and add the toppings.

6. Bake at 180°c for 10-15 minutes, or until golden brown. Keep a close eyes at final few minutes to avoid burnt buns.. Let the bread cold on a rack for about 30minutes before consuming.


Tips:
The buns made with this recipe is super soft and the softness can maintain up to 3 days, the key is to give it enough time for second rise.

Monday, May 25, 2015

Rolled Eggs & Ham


This is one easy breakfast and it's even suitable for lunch box, you shall try this if your kids love cheese or ham, or both. :)


I wish I have better pictures to share, but the kids started grabbing and eating before I could snap any picture... 

 
Preparation Time: 5 minutes
Cooking Time: 8 minutes
Make 3 egg rolls of 7" long each


Ingredients:
• 100gm hams of your choice, cut to about 2mm each
• 1 slice cheddar cheese, cut into 3 strips of equal size
• 4 medium eggs, beaten
• few fresh basil leaves, chopped  
• 1 tablespoon fresh milk
• a dash of pepper


The Making:
1. Heat up pan, add a slice a bacon to lightly cook on both side for about 10 seconds then set aside. The bacon will coat the pan with oil so there is no need for additional cooking oil.

2. Add milk, basil leaves and pepper into the egg, beat to mix well and add one large scope into the hot pan. Spread out to form a perfect circle.


3. Place the bacon over the egg omelette, and a slice of cheese in the middle. Using the spatula and a spoon/chopsticks, slowly roll the omelette from one end to the other. In the half way while rolling up, I added half a scope of egg omelette to make it into an oblong shape instead of circle, this makes a bigger egg roll.

4. Cook the remaining egg omelette rolls using step 1-3 and cut into thick slices of about 1.5" each only when they have cold down (it will crack easily if cut when hot)


Serve with your favourite sauce or just eat directly, either way they are delicious.. 


Meat Free Version
Not a meat lover? Just replaced ham with carrots, potatoes and raisins, and you have one healthy vegetarian meal. You can even add a seaweed sheet. Seen here, I used purple carrots so the rolls looked kind of mouldy. LOL.


Sweat free breakfast that anyone can make.. Enjoy!

Wednesday, January 28, 2015

{Breadmaker} Almond Hokkaido Loaf Bread, Ultra Soft!


The kiddos had been begging for soft bread for them to pack to school past few days - I had been giving them cookies and cereals with fruits for thinking they may be tired of bread, apparently they didn't. :)

So I decided to try out another new recipe this time. Hokkaido bread, which is even softer in texture with the additional milk powder used. I knew it would be nice, but did not expect it to be this good. Absolutely store bake quality.

I used "Stuffed bread" recipe (menu 8 for Panasonic machine), but after the 55 minutes kneading, instead of taking the dough out for shaping / filling, I just let it stayed inside the pan, brush with some egg liquid and sprinkled with rich amount of almond flakes on top and continue baking.

The result? Ultra soft and fluffy bread,  like a feather-light pillow. 


A week later, I decided to make some sandwiches for lunch and this fluffy Hokkaido bread was the perfect choice. I replaced the almond flakes with organic sunflower and flaxseeds, making it a protein rich bread.

I had the crust layer, if only I managed to shot the middle layer to show how soft and fluffy they are. The kiddos even enjoy  eating the bread as is.


Preparation Time: 10 Minutes
Baking Time: 2 Hours 15 min
Serving size: 500gm loaf / 6-8 slices

Ingredients:

• 215g organic bread flour / High protein flour 
• 1.5 tbsp / 12g milk powder
• 2 tbsp / 25g granulated or brown sugar
• 1/4 tablespoon salt
• 110ml water at 5c°(I just added some ice cubes)
• 30g unsalted butter
• 1/2 of a medium egg, beaten 
• 11/2 teaspoon instant dry yeast
• 30g chocolate chips / chunks 

For topping:
• 1/2 egg for brushing 
• 20g almond flakes 

The Method:
1. add all ingredient into bread pan, except yeast in the yeast dispenser.

2. Select menu "8" (for Panasonic BM) or Stuffed Bread recipe on your bread maker. Press "start".

3. When the dough is ready and you heard the beep beep sound (55  minutes later), open the lid (DO NOT PRESS STOP!), brush egg liquid onto the top of the dough, sprinkle with almond flakes. Then closes the lid and press "Start" to continue baking.

The second fermentation will begin and it shall take about 1h15m to complete. Let the bread cold on a rack for about 10-20min before consuming.

Enjoy!

Monday, January 19, 2015

{Breadmaker recipe} Chocolate Raisins Bread Loaf


I have just tested a new easy & yummy bread recipe that I though I ought to share. This is one that my kiddos really really like and I have been baking this twice a week. Hope you have not grow bored of yet another bread recipe,  I am some how hooked on the convenience of having an all-in-one bakeware. :)

It's just a simple soft bread recipe but so soft and fluffy as usual.


Preparation: 5 minutes
Baking time: 4 hours 10 min (Soft bread) / 2 hours (Rapid bread)


Ingredients:

For Soft Bread:
• 250gm high gluten flour / high protein flour (you may used organic unbleached flour)
• 15gm unsalted butter, cut into small cubes
• 2 tablespoon / 24gm granulated sugar (I used organic brown sugar) 
• 1 teaspoon / 5gm salt 
• 1 tablespoon / 6gm milk powder 
• 190ml water at 5°c (I added 2 ice cubes to normal drinking water)
• 30gm cut dark chocolate (or chocolate chips will do)
• 1 tablespoon organic raisins 
• 1 teaspoon / 2.8gm instant dry yeast 
• 30gm cut dark chocolate (or chocolate chips will do)
• 1/4 cup organic raisins 

For Rapid Bread:
• 280 gm high gluten flour / high protein flour (you may used organic unbleached flour)
• 10 gm unsalted butter, cut into small cubes
• 2 tablespoon / 24gm granulated sugar (I used organic brown sugar) 
• 1 teaspoon / 5gm salt 
• 1 tablespoon / 6gm milk powder 
• 210ml water at 5°c (I added 2 ice cubes)
• 1.5 teaspoon / 4.2 gm instant dry yeast 
• 30gm cut dark chocolate (or chocolate chips will do)
• 1/4 cup organic raisins 


The Making:
1. Put all ingredients into your bread-maker as per the order list (including chocolate), put yeast in the yeast compartment and raisins in the nuts compartment, select "Soft Bread" or "Rapid Bread" recipe accordingly (please note I am using Panasonic machine, the outcome & time may different depending on the machine you used). 

If your breadmaker don't have separate compartment for yeast, just add the yeast into the pan but endure it is separated from the sugar and salt.

2. Let the breadmaker does its work until done. 

That's it, you may let the bread cool on a wired rack for about 30 minutes before enjoying, or store it in an airtight container if you are only eating it the next day.


Useful Tips..
• Texture of bread made using high gluten flour is softer and fluffier compared to using normal bread flour. However do note that some kids shall avoid gluten in their diet. Please consult your pediatrician as I am not specialist in this area.
• You may use Timer function if you selected "Soft Bread", so you can schedule to have the bread ready in the morning.

{Breadmaker Recipe} Soy Milk Bread 面包机食谱:豆奶面包


Bi-Lingual | 中英对照


I wanted to improve the nutrition value of the bread that I have been almost daily, so decided to make some slight changes by using organic soy milk with the soft bread recipe, and it turns out great! Soft and have a light scent of soy milk.


The perfect loaf.

Preparation: 5 minutes
Baking time: 2 hours 
Serving for: 500gm loaf


Ingredients:

• 280 gm unbleached bread flour ror high gluten flou
• 15 gm unsalted butter, cut into small cubes
• 2 tablespoon / 24gm granulated sugar (I used organic brown sugar) 
• 1 teaspoon / 5gm salt 
• 1 tablespoon / 6gm milk powder 
• 210ml multi-grain soy milk (I added 3 ice cubes)
• 1.5 teaspoon / 4.2 gm instant dry yeast 
• 1/4 cup organic raisins / dried cranberries 


The Making:
1. Put all ingredients into your bread-maker as per the order list, put yeast in the yeast compartment and raisins in the nuts compartment, select "Rapid Bread" recipe accordingly (please note I am using Panasonic machine, the outcome & time may different depending on the machine you used). 

If your breadmaker don't have separate compartment for yeast, just add the yeast into the pan but ensure it is separated from the sugar and salt.

2. Let the breadmaker does its work until done. 

That's it, you may let the bread cool on a wired rack for about 30 minutes before enjoying, or store it in an airtight container if you are only eating it the next day.


Useful Tips..
• you may replace soy milk with fresh milk too.
• Timer function is not available with "Rapid Bread" option. 


备:5
烘烤时间:2
Size 500克面包

主料:

• 280克未漂白高筋粉或面包
• 15克黄油,切成小方
• 2汤匙/ 24gm砂糖(我用有机红糖)
• 1茶匙/ 5gm
• 1汤匙/ 6gm奶粉
• 210毫升多谷物豆浆(我加了3块)
• 1.5茶匙/ 4.2干酵母
• 1/4杯葡萄干有机/蔓越莓干

1.将所有材料放入面包,加酵母葡萄干有机/蔓越莓干,确保酵母糖盐分离。选择快速面包项, Start. (注:我用的松下面包机,不同的面包机可能不同的项)
2.让面包机操作 (2时)立即取
3. 让面包冷却约30立刻可以享, 或将其存放在密封的容器中


贴心提..
多谷物豆用普通豆鲜奶取代
快速面包不可用时器功能

Sunday, January 4, 2015

Mini Cheese & Chicken Floss Buns


The kids really liked the cheese buns I made yesterday, so I decided to make another batch, but using muffin pan instead of the cake pan.

They turned out wonderful.
The Cheese "muffin"
The Chicken Floss buns that looked like Pau.

Super fluffy...

The making... My favorite farmhouse cheddar cheese block never fails me. 

Refer to recipe and bread making tips in my precious posting here.

Even my girl who does not usually like bread cannot resist this cheesy treat. Chomped down the whole cheese bun while kept telling me it's delicious.  

Go ahead, try it. You'll love it. :)


Friday, January 2, 2015

Easy Peasy Cheese & Herb Buns


Ever since I've got the baker-maker, I have been diligently baking and trying out different recipes almost every night. The kids love the fresh bread and so do we. Smell of fresh loaf in the morning is just irresistible.

Yesterday while window shopping, we walked pass a bakery and saw the cheese bread, ahh.. My boy's favorite. So I decided to give it a try and it turned out beautifully!


So soft and fluffy like a pillow.

Little guy helped me brushing the egg liquid 

Then happily added the shredded cheese.

Ready to make some? Here's how.

Preparation: 10 + 10 minutes
Waiting time: 45 + 15 minutes 
Baking time: 15 minutes 

Ingredients:

* previously I wrongly stated sugar measurement as 24gm, adjusted. Sorry!
Bread dough
• 280gm high gluten flour / high protein flour (you may used organic flour)
• 50gm unsalted butter, cut into small cubes
• 3 tablespoon / 36gm granulated sugar (I used organic brown sugar) 
• 1 teaspoon / 5gm salt 
• 2 tablespoon / 12gm milk powder 
• 1 medium egg
• 160ml water at 5°c (I added 2 ice cubes)
• 1 teaspoon / 2.8gm instant dry yeast 

Topping:
• 1 egg, beaten (for brushing)
• 1 cup shredded cheedar cheese (approximate)


The Making:
1. Prepare the bread dough in your bread-maker as per the order list, put yeast in the yeast compartment, select "bread dough" recipe and it shall requires about 1 hour. 

If you are making without a breadmaker, add all ingredients into a mixer (make sure you add the yeast last and it shall not touched the sugar or salt), knead into a dough using the K attachment.

2. Cover the dough with a clean tower and let it rise for 45 minutes, or like me, leave it overnight in a freezer and it will rise to perfection by next morning.

It shall rise to double the original size and with a smooth surface. When pressed gently with a finger it will bounced back quickly (instead of remain sunken)

3. On a clean surface, scatter some bread flour and cut the dough into 8 balls of equal size. Place them in a bread / baking pan with about 2cm apart (prior to that, brush some cooking oil or melted butter over the base and side of the pan to avoid sticking).

4. Cover the dough with a tower and let it rise for another 15 minutes for second rising.

5. Preheat the oven to 150°c.

6. Brush some egg liquid over the bread dough and add a generous amount of shredded cheddar cheese. Sprinkle some oregano leaves if you like.

6. Bake for 15 minutes until golden brown. Your kitchen will be filled with the aromatic cheesy smell that is too good to resist. But resist, you must. Wait for at least 15 minutes for the bread to cold down before eating.

That's it, easy peasy gourmet bread...

Happy baking!


This is the different of the dough before & after I left them overnight in the fridge. 

Useful Tips..
• if ambient temperature is above 26°c, reduce water level by 10ml (or the bread may be too moist).
• you may omit or substitute cheese with seeds of your choice, but the melted cheese really smell too nice.
• leaving the dough in the fridge overnight helps to slowdown the rising process.

Sunday, August 17, 2014

Breakaway Nutella Brioche Bread, another travel Inspired!


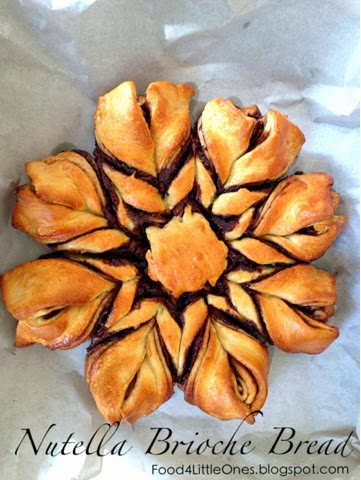
When we were at Strasbourg, a French medieval town, the hotel we stayed  served complimentary breakfast buffet every morning and one thing I really liked was the brioche bread. It was soft, fully and smell so good with the chocolate swirl in between.  I had not came across any brioche in most bakery that I usually patronage (maybe I did not pay attention), so I decided to give it a try at home.
When I saw this video clip by Steve's kitchen on how to make Nutella brioche bread for sharing on YouTube, I knew this is the recipe that I must try, and it didn't disappoint me. I just followed every step that Steve showed and it turned out beautifully! In fact he has many more recipes on his website that are really interesting.
My beautiful brioche


Breaking away is so easy

Last one left, and it's mine!


Making of Nutella Brioche Bread, step by step in picture

Could have almost fooled my family that I am a master in bakery, LOL, in fact I am no where near good with bread making.

I have summarized the steps based on the video, but you may also want to refer to the video for clearer understanding. It is a tedious recipe as it involved many steps and waiting time in between, but I assure you the outcome is worth it. :)

Preparation time: 55 minutes
Baking time: 15-20 minutes
Waiting time: 1h20min or more
Serving for: 8 slices

Original receipt adopted from Steve's Kitchen
Ingredients:
  • 450g of Bread Flour
  • 70g of a cup of Sugar (I substituted with brown sugar)
  • 2 Teaspoons of instant Dried Yeast
  • A pinch of Salt
  • 30g of melted Unsalted Butter
  • 180ml of warmed Milk 
  • 2 Egg Yolks, separate the whites to glaze the bread
  • 1 cup of Nutella, melted in microwave for 10 seconds (I skipped the microwave)


The Making:

1. In a clean bowl, mix bread flour, sugar, yeast and salt, mix well using a fork, then add the melted butter, milk and egg yolks. Mix the ingredients until it turns into a dough ball then move it to the table top.

2. Knit by hands for 5-10 minutes, or use the mixer. The dough shall become smooth and when you sink the finger it, it will renounce to the shape.
checking if the dough is ready 
3. Coat the dough with a light layer of olive oil, then place it into a clean bowl, cover a layer of cling foam over the bowl, follow by a damp towel. Let the dough proof for at least an hour or more until it rises to double the size. (I put mine in the microwave which was warm after I heated the butter.
4. Prepare a baking tray with a non stick baking sheet on top (or brush with some oil).
5. Cut the dough into 4 equal parts. On a clean surface, sprinkle some flour and roll the dough into a circular approximately 10" I'm diameter. Spread Nutella onto, then slip it onto the baking tray.
6. Continue the same step for next 3 dough (last dough shall not recquire Nutella spread), and stack them onto one another.
7. Place a dinner plate on top the stacked dough, use a sharp knife and cut along the plate; you shall have a nice circular dough now.
8. Place a drinking cup in the middle of the dough, use a sharp knife and cut 12 straight lines along the dough to make into equal sizes, starting from center to the edge (imagine a sunflower with 12 pedals).

9. Twist and fold 2 pedals together to form a braided pattern, continue with remaining pedals until you get a nice Sunflower shape. 

10. Preheat the oven to 180°c / 370°F.
11. Cover the dough with a clean damp cloth and let it proof for another 10 minutes. 
12. Brush the egg whites evenly onto the dough, then pop it into the oven to bake for 15-20 minutes until it turns golden brown.
It smells so so good when I took my Nutella Brioche bread out of the oven, wish I could sink my teeth into it right away. When I shared it with the family the next morning, all 8 pieces and the center piece where gone in just 5 minutes. 
This recipe is certainly a keeper for me! :)

The extra that was cut out? I made them into Nutella rolls and drip with honey when serve. Yum.. :)


Useful Tips:
• When adding the yeast into the dry ingredient, avoid touching the salt.
• Milk must be warm in order to activate the yeast. Just warm it up in microwave for about 30 seconds.
• This is an ideal choice for party, just a few of them and watch your friends break your bread apart. :)